- Item Name : Edunex - Education LMS & Online Course WordPress Theme
- Author : Theme Junction
- Support : https://support.themejunction.net/
Getting Started
Welcome to Edunex.
Edunex is a clean and modern theme designed for business consulting and services related businesses. The theme features layouts tailored for showcasing services, projects, pricing, testimonials, and contact form. You’ll also get unique pages such as About, Services, Portfolios, Blog, and Contact to present your garage or auto service business professionally.
Requirements
You need to have WordPress version 6.0 or higher installed for this theme to work properly. We strongly recommend using the latest stable version of WordPress to ensure that all known bugs are fixed and security issues are addressed. Other requirements include:
- PHP version 7.4 or higher is required. For optimal performance, we recommend using PHP version 8.1 or above.
- MySQL version 5.6 or higher OR MariaDB version 10.0 or higher.
- WordPress memory limit of 128 MB or greater.
Server Requirements: https://make.wordpress.org/hosting/handbook/handbook/server-environment
PHP Configuration For Hosting Server
Use the following configuration in your PHP configuration file on the hosting server to fix issues with Elementor editing and demo import.
- max_execution_time = 1000
- max_input_time = 600
- max_input_vars = 1000
- memory_limit = 512M
- post_max_size = 128M
- upload_max_filesize = 128M
- allow_url_fopen = ON
- asp_tags = OFF
- cURL = ON
What's Included
After purchasing the Edunex theme on ThemeForest with your Envato account, go to your Downloads page. From there, you can choose to download either the installable WordPress theme file (ready for direct upload) or the complete Edunex theme package.
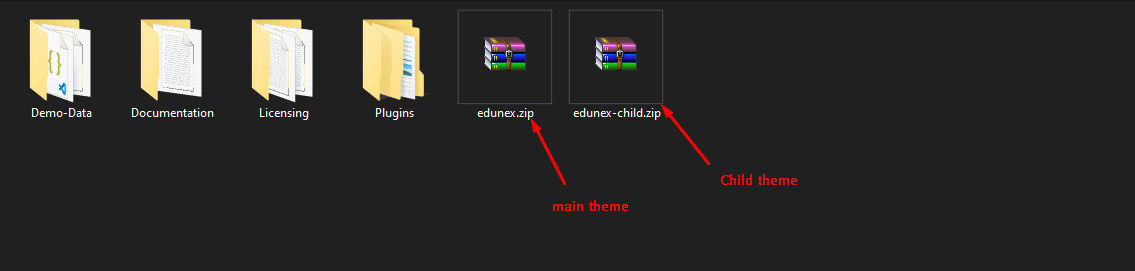
- edunex.zip : Installable WordPress theme file.
- edunex-child.zip : Child theme with a readme.txt note about usage.
- bundled-plugins : Contains required plugins for the theme.
- sample-data : Demo content for importing sample layouts.
- licensing : Terms and conditions of the license.
- documentation-link.txt : Link to the online Edunex documentation.
Theme Installation
Important: If you download the full package from ThemeForest and try to upload it directly to WordPress, you may encounter the following error: “The theme is missing the style.css stylesheet.” To avoid this, make sure you extract the package first and upload the correct installable theme file (edunex.zip) to WordPress.
Please follow the instructions in the video to learn how to install WordPress on your hosting.
- For local host: https://www.youtube.com/watch?v=snFzbPm_RUE
- For cPanel: https://www.youtube.com/watch?v=t-YBqV2ReR0
Using Theme Uploader:
After that, you need to install and activate the following pre-packaged plugins.
Server Requirements: https://make.wordpress.org/hosting/handbook/handbook/server-environment
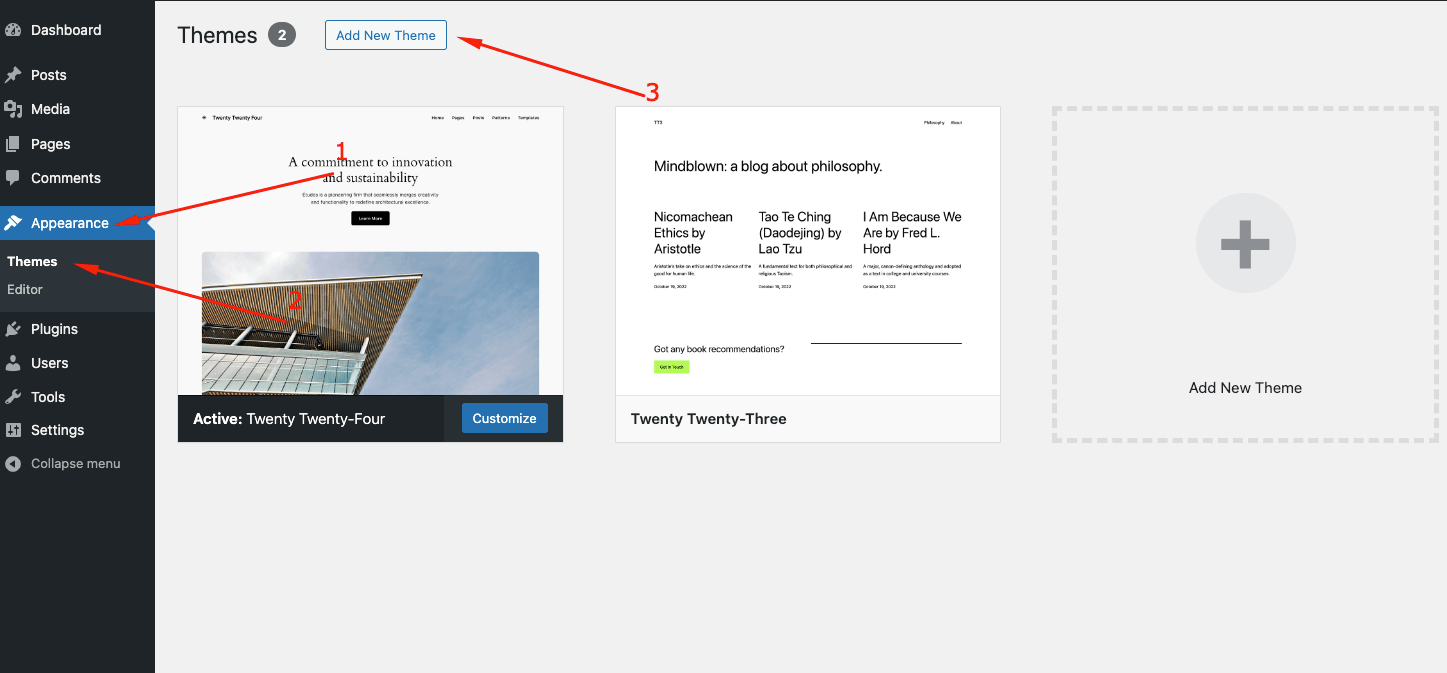
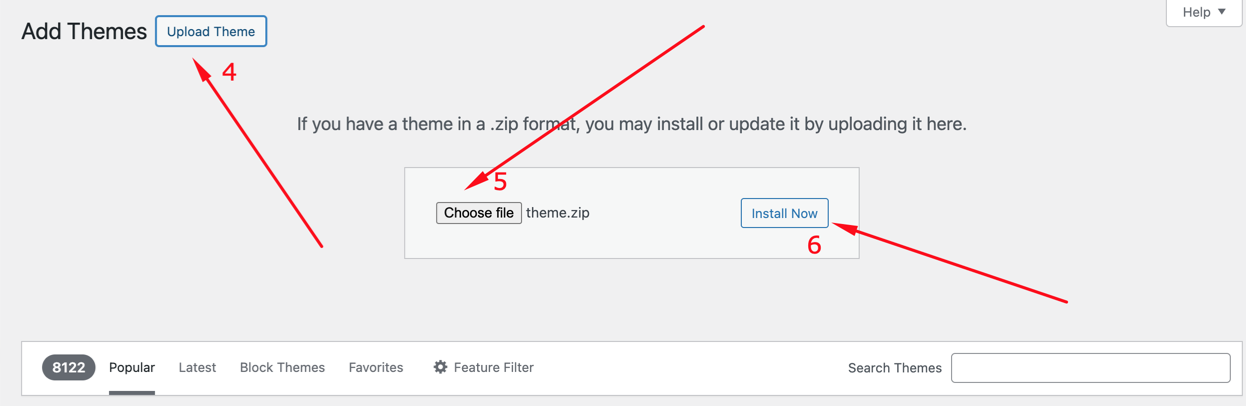
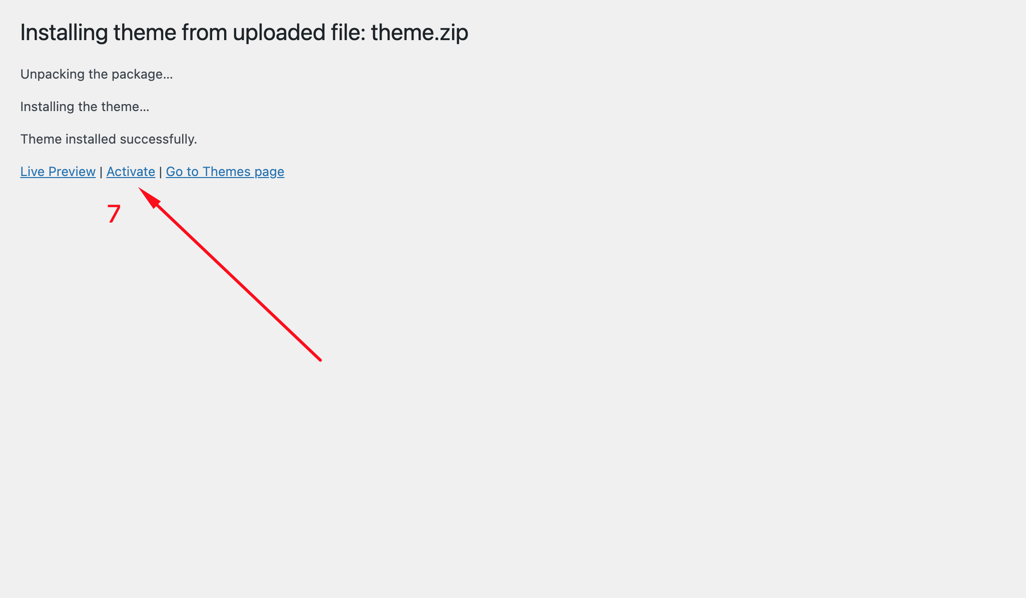
Please follow the steps as shown in the images below.
- From the dashboard go to Appearance Themes Add New Upload Theme
- Click on “Choose File” and select edunex.zip
- Click on “Install Now”
- Active the Theme
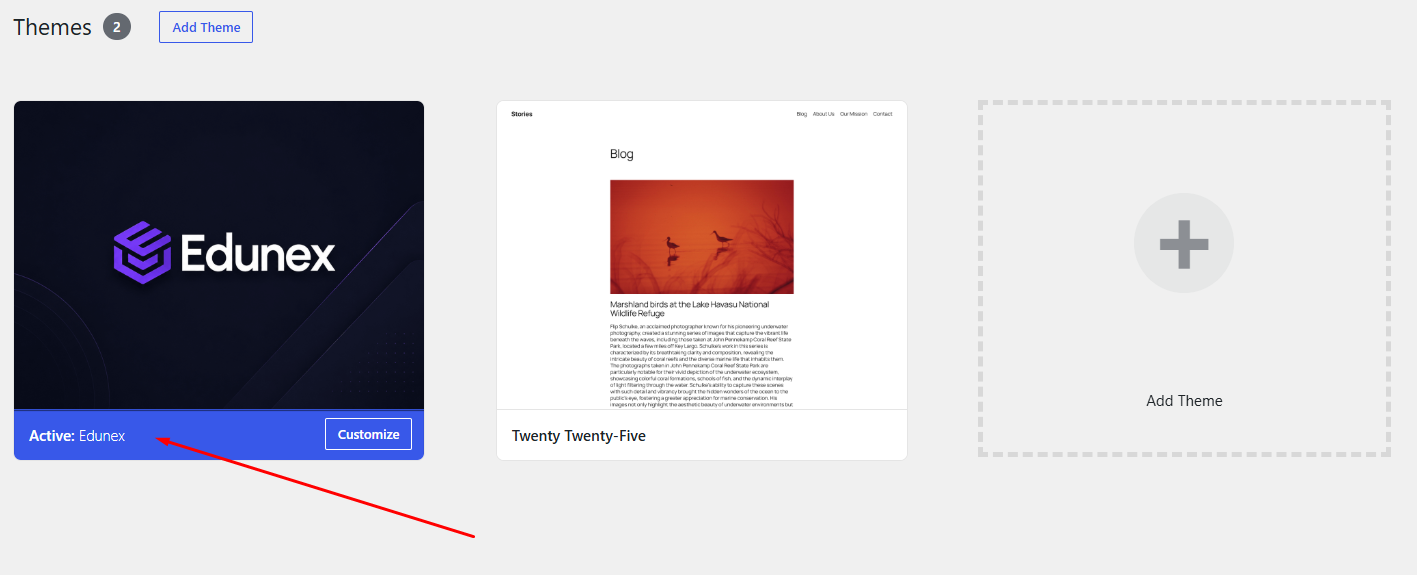
Using FTP Clients:
Follow these steps to upload your theme using an FTP client:
- Use an FTP client, such as FileZilla, to access your WordPress installation directory.
- Navigate to the /wp-content/themes/ folder and upload the extracted Edunex theme folder.
- Log in to your WordPress Admin Dashboard and go to Appearance Themes
- Locate the Edunex Theme in the list of available themes and click Activate to complete the installation.
Child Theme
Our theme is fully child-theme compatible. A basic child theme is included in the download package, containing only the minimum required files. If you plan to make any code customizations, we highly recommend doing so within the child theme to ensure your changes are preserved during theme updates. Learn more about child themes here.
Plugin Installation
After installing the theme, you need to install and activate all required plugins.

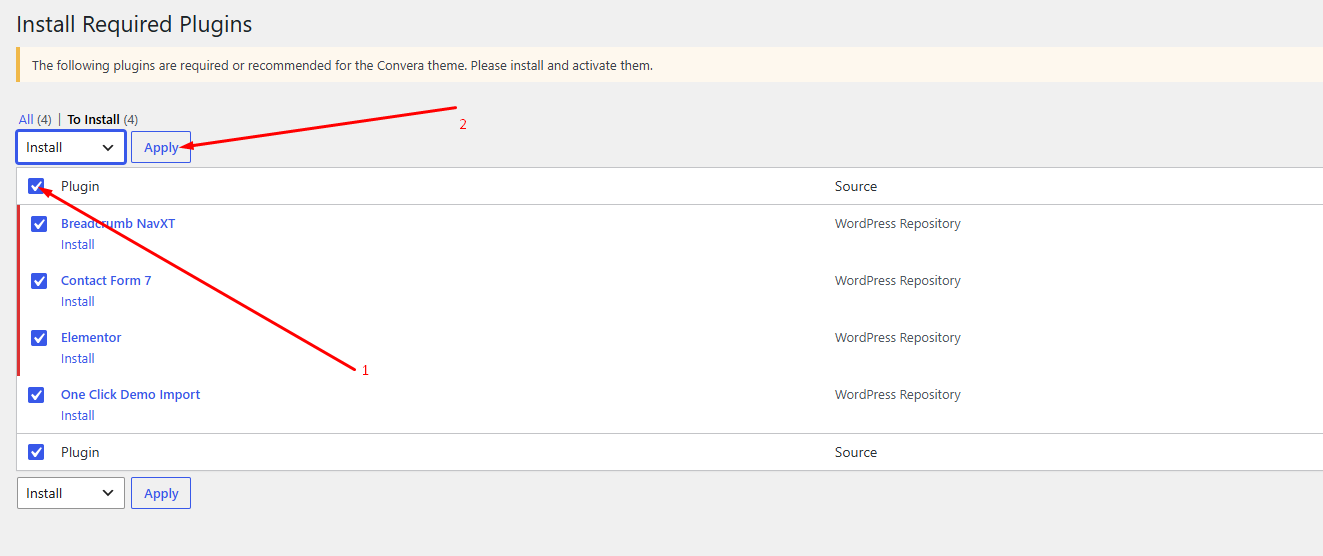
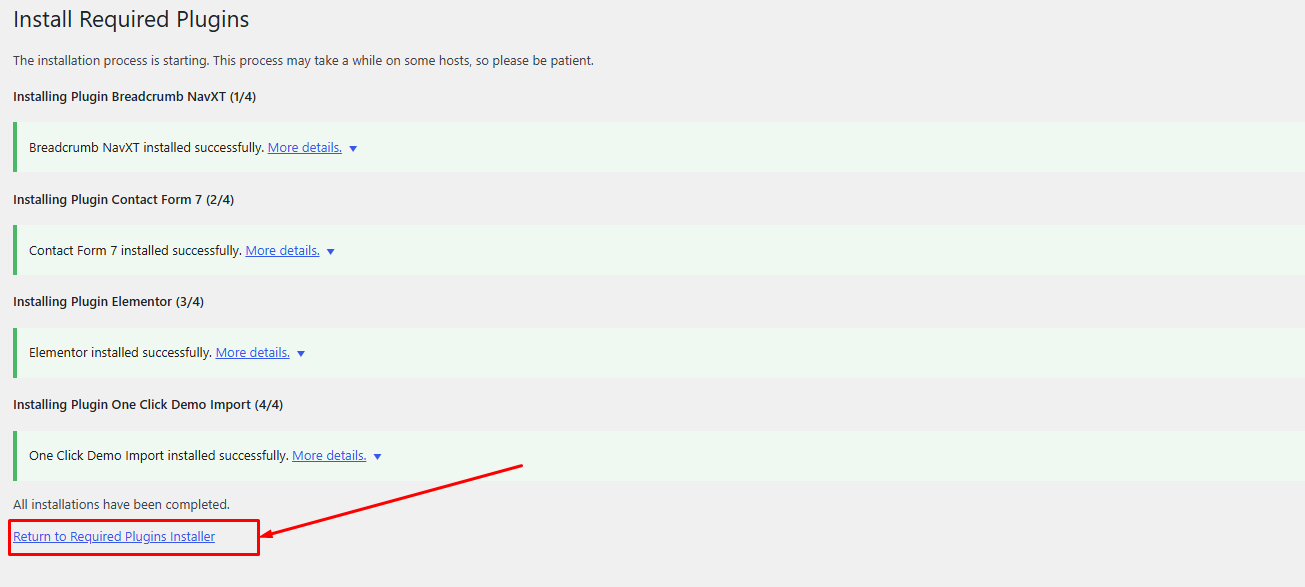
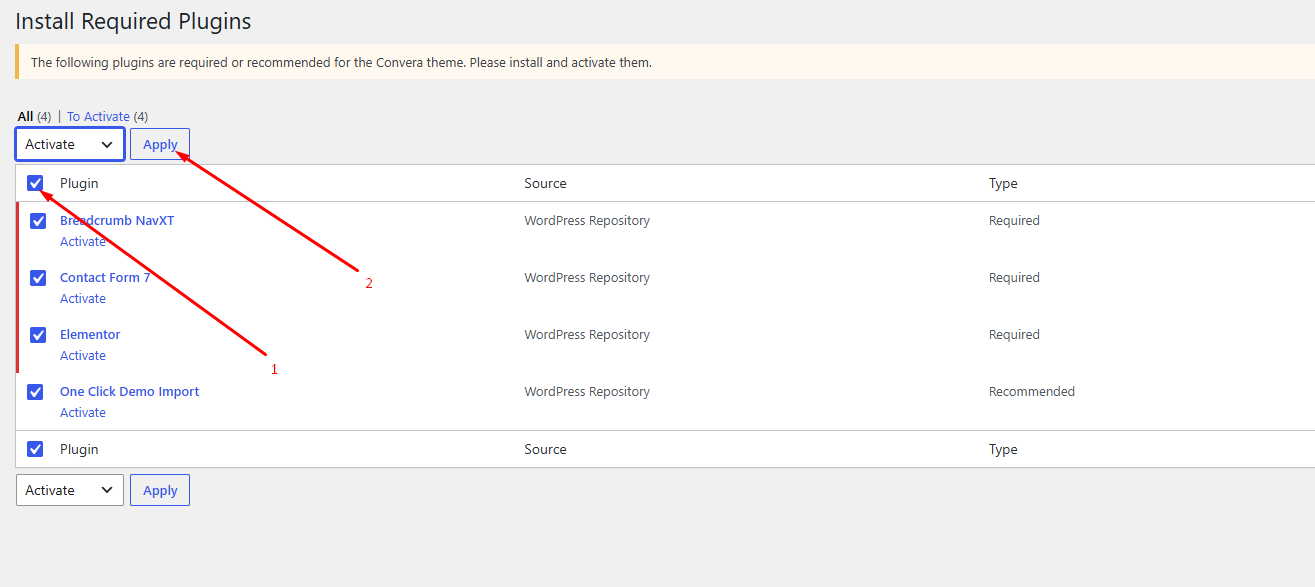
Importing Demo Contents
We provide two methods for importing demo content: Automatic and Manual. You can choose to follow either method.
- Automatic (Recommended): This method will remove all existing data, so it should only be used on a fresh website. It is faster because the import process requires just one click, after which everything is handled automatically. If you want an exact replica of the demo website without performing any manual configuration after importing the data, this method is the most suitable option.
- Manual: Use this method only if the automatic demo import fails or if you already have a working website with existing content (e.g., posts, pages, etc.).
Automatic Import:
Important: Before proceeding, please note that completing the demo import will remove all existing settings and content, replacing them with the demo content. Therefore, it is highly recommended to perform this process only on a fresh site.
- Ensure that the Edunex Parent Theme is activated on your site.
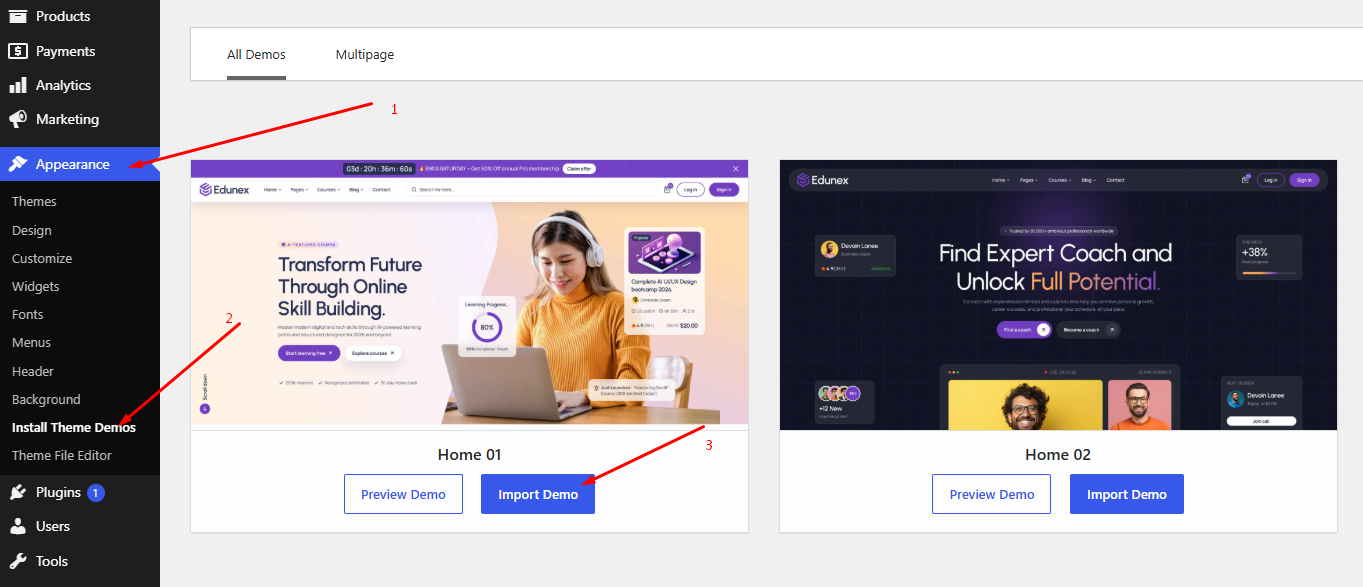
- From the WordPress dashboard, go to Appearance Install Theme Demos Import Demo
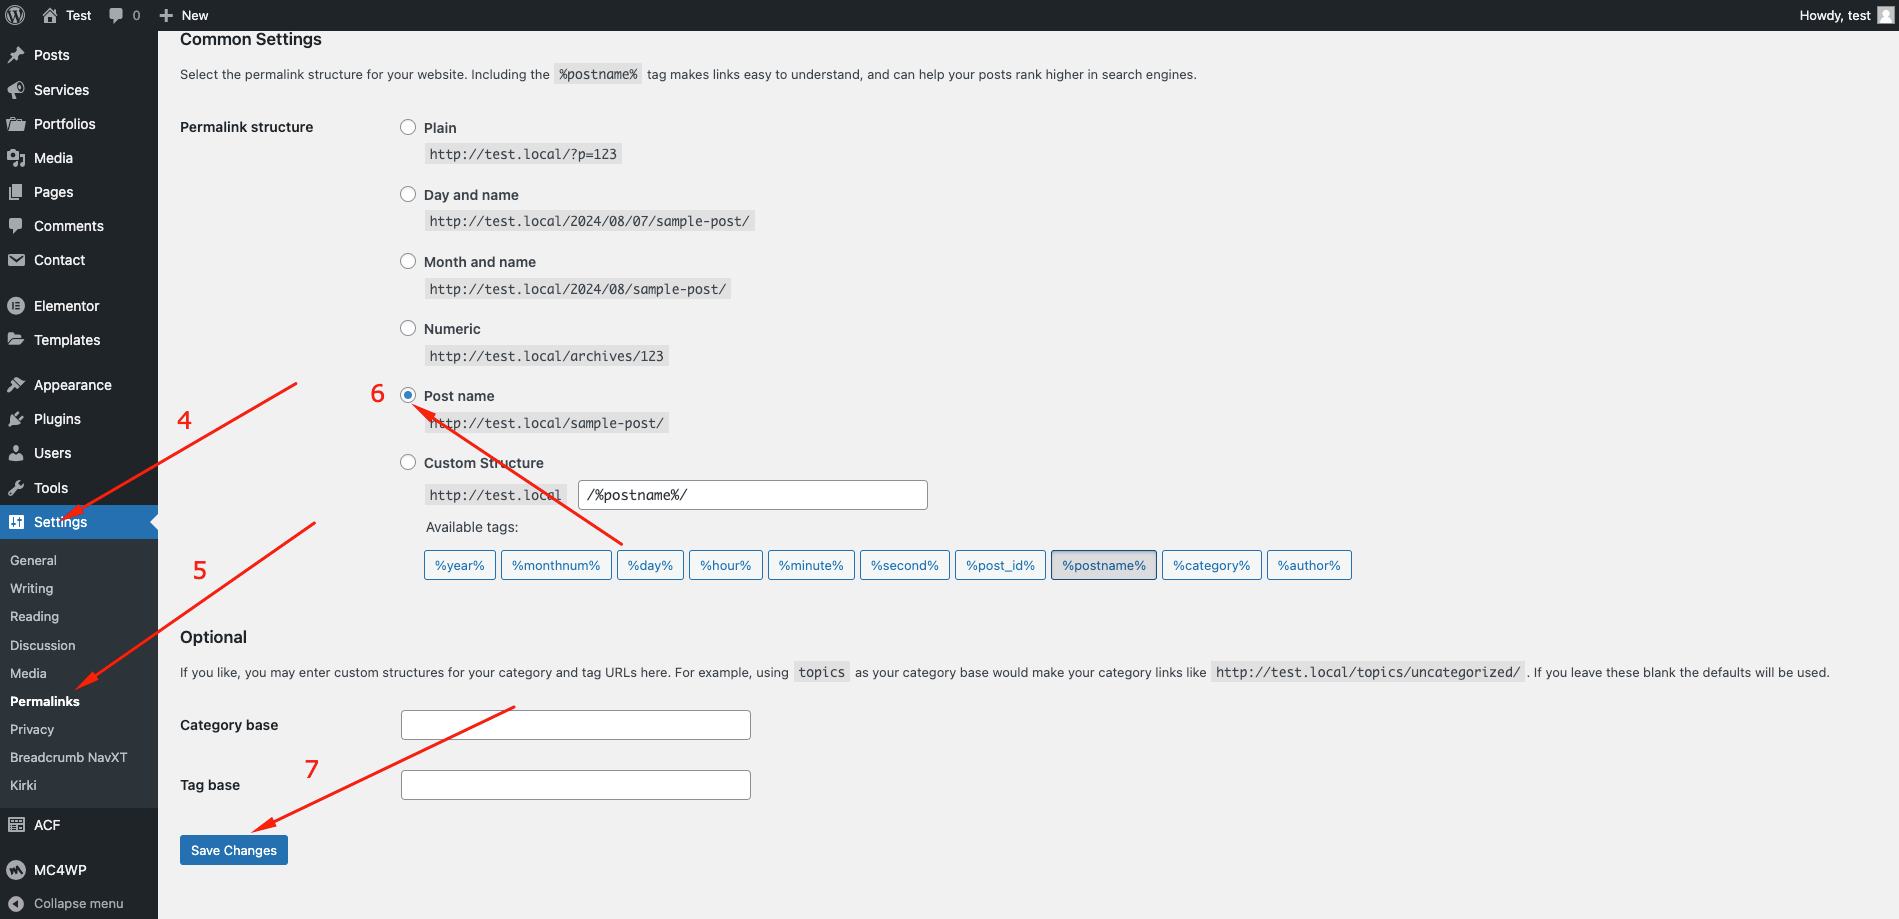
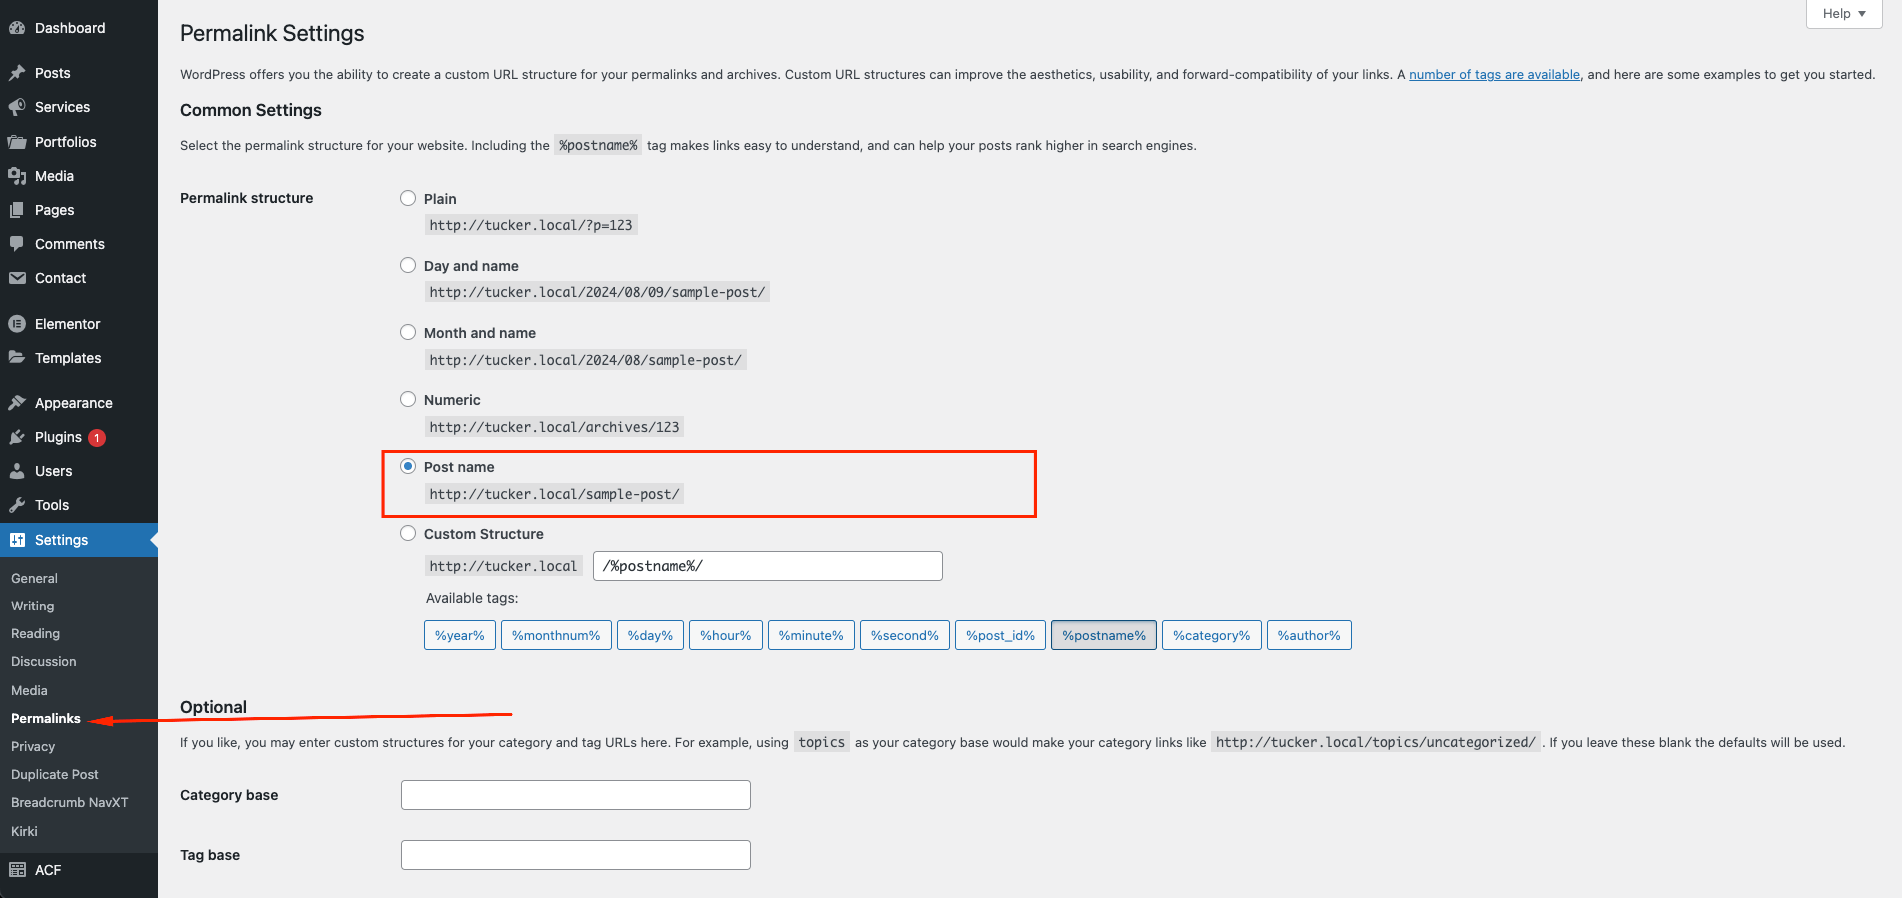
- To update permalinks, navigate to Settings Permalink Post name Save Changes
Manual Import:
We have included sample content in the sample-data directory of your theme package. You will need to import this content to set up the demo.
- Ensure that the Edunex Parent Theme is activated on your site.
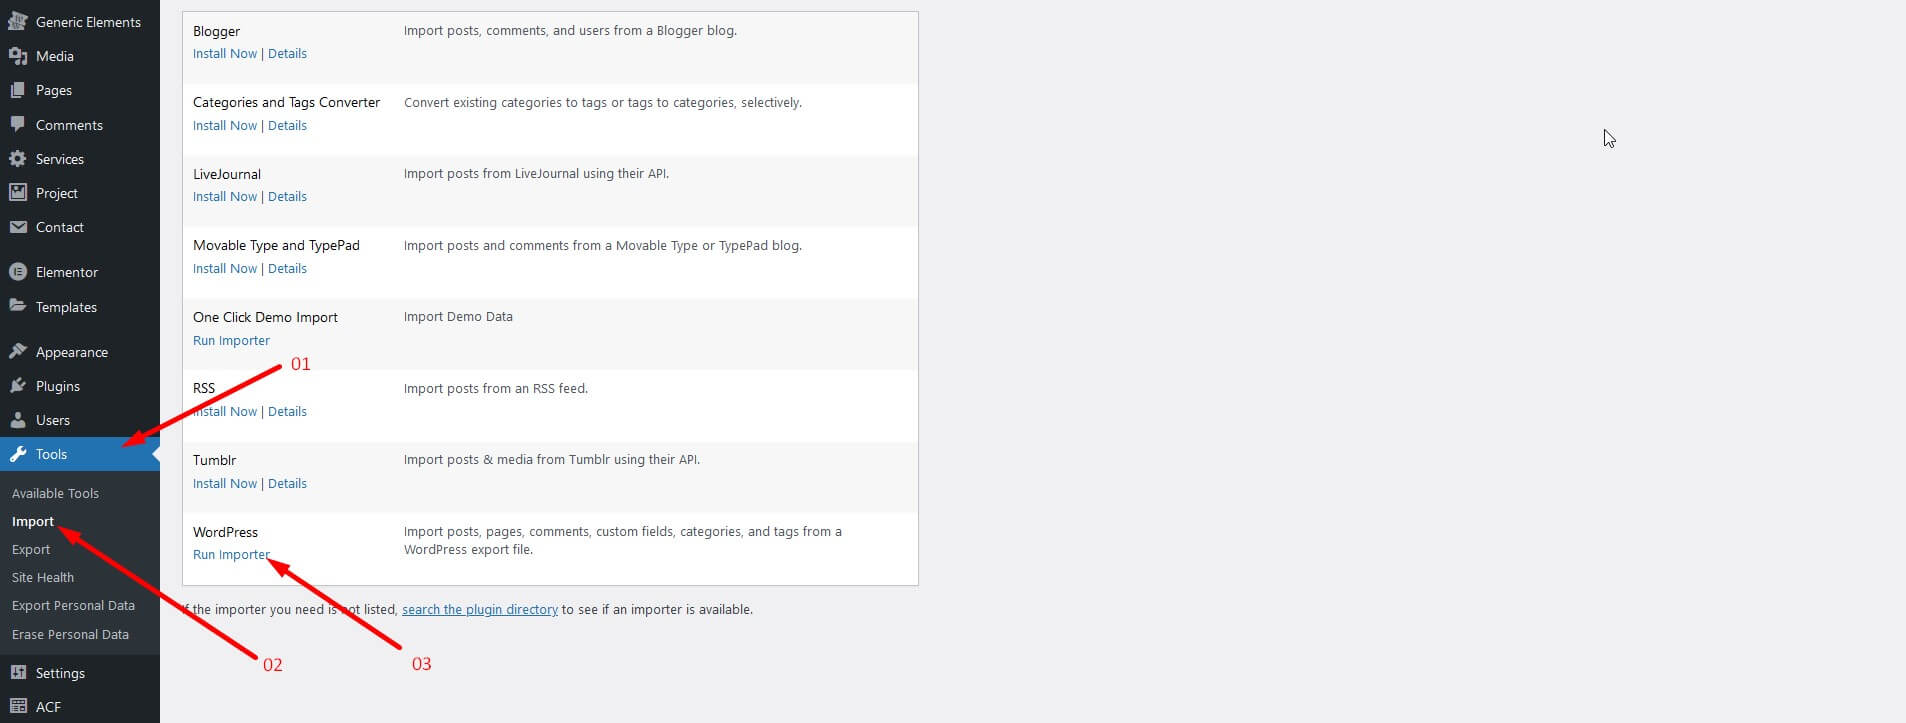
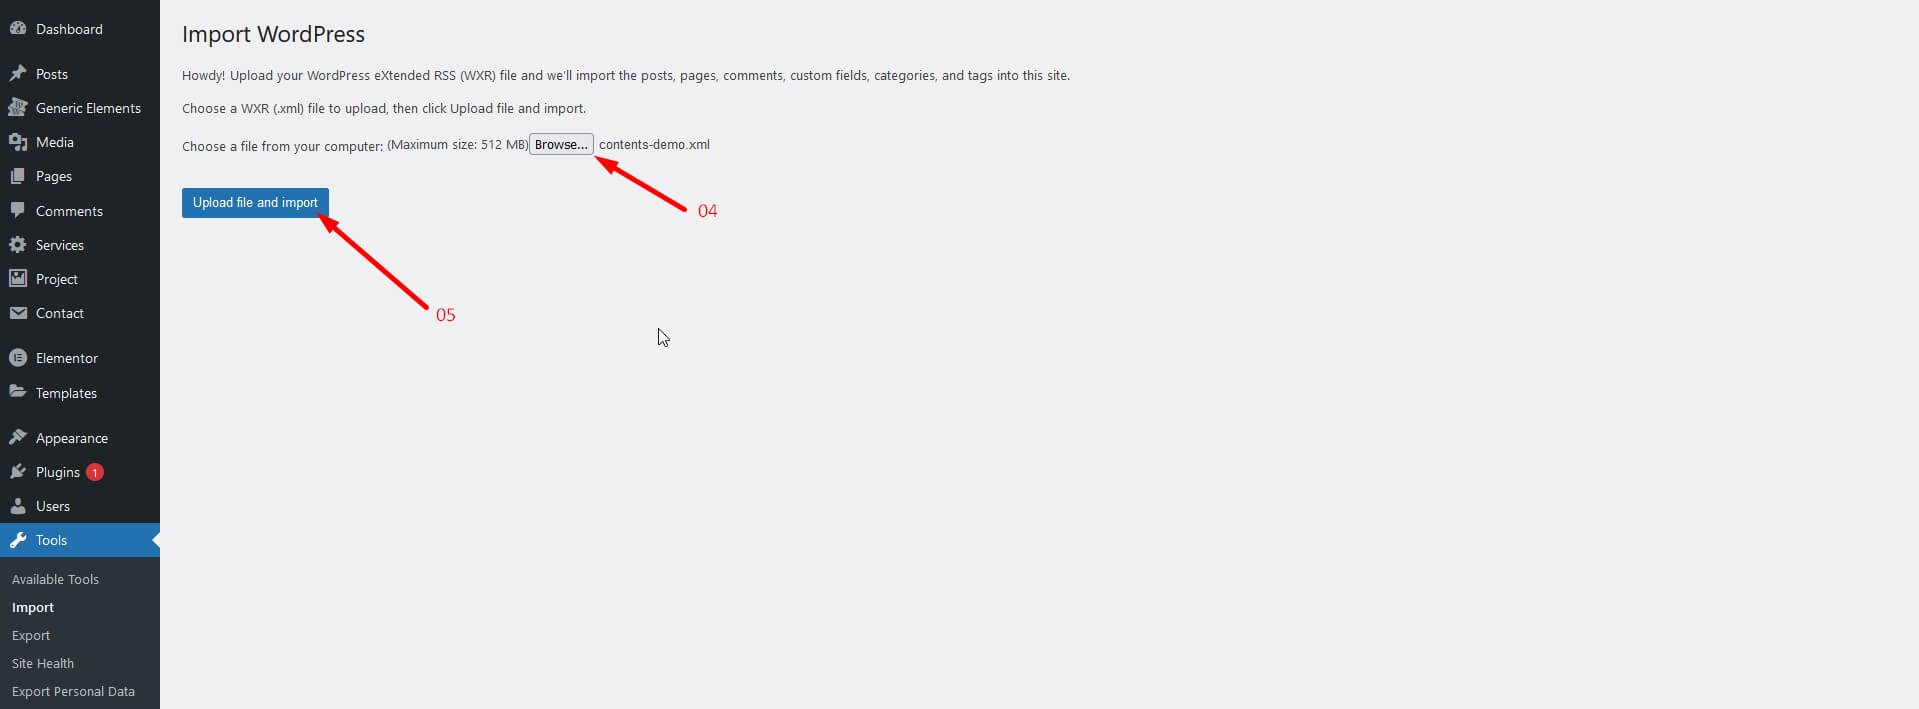
- Importing Contents : From the dashboard, go to Tools Import Install Now (WordPress) Run Importer Choose file -> contents-demo.xml Upload file and import
-
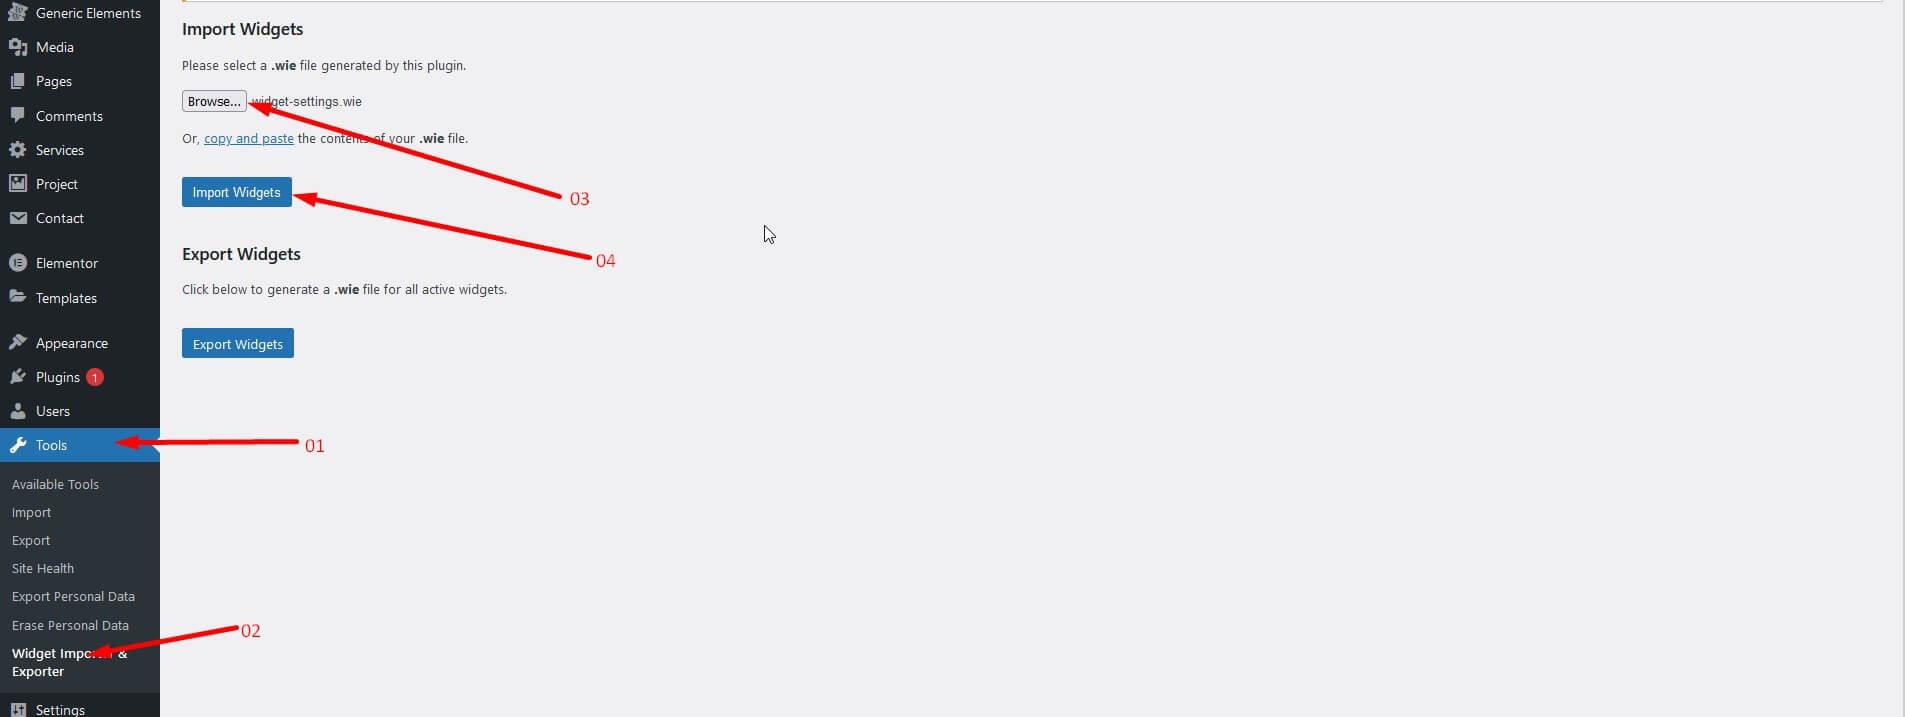
Importing Widgets :
Install the Widget Importer & Exporter plugin to import widgets.
Tools Widget Importer & Exporter Choose file -> widget-settings.wie Import Widgets -
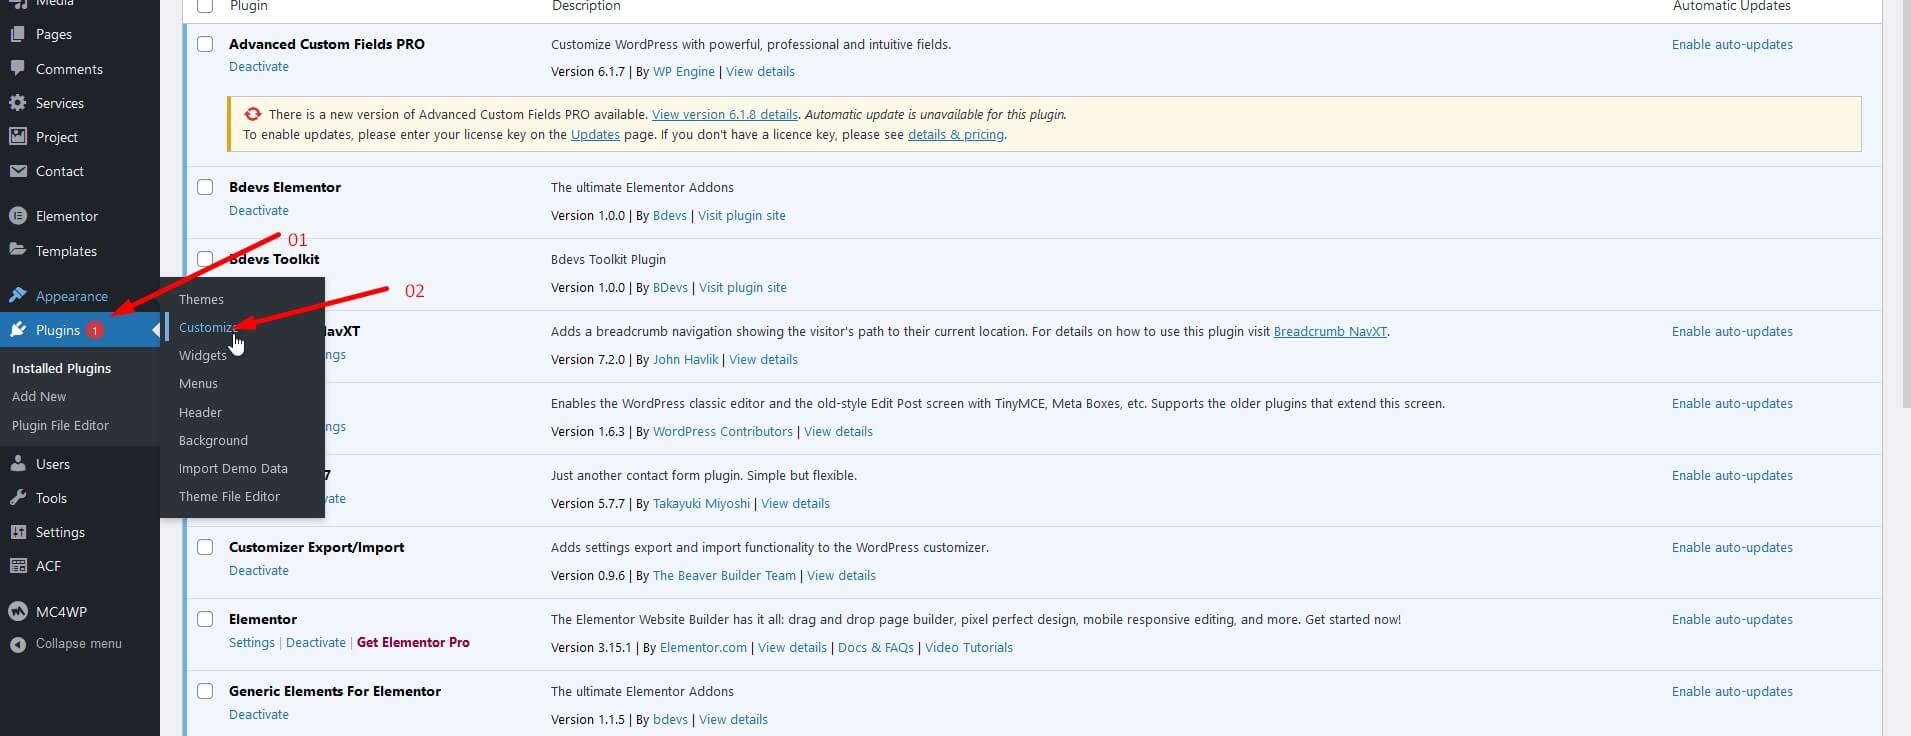
Importing Customizer Options :
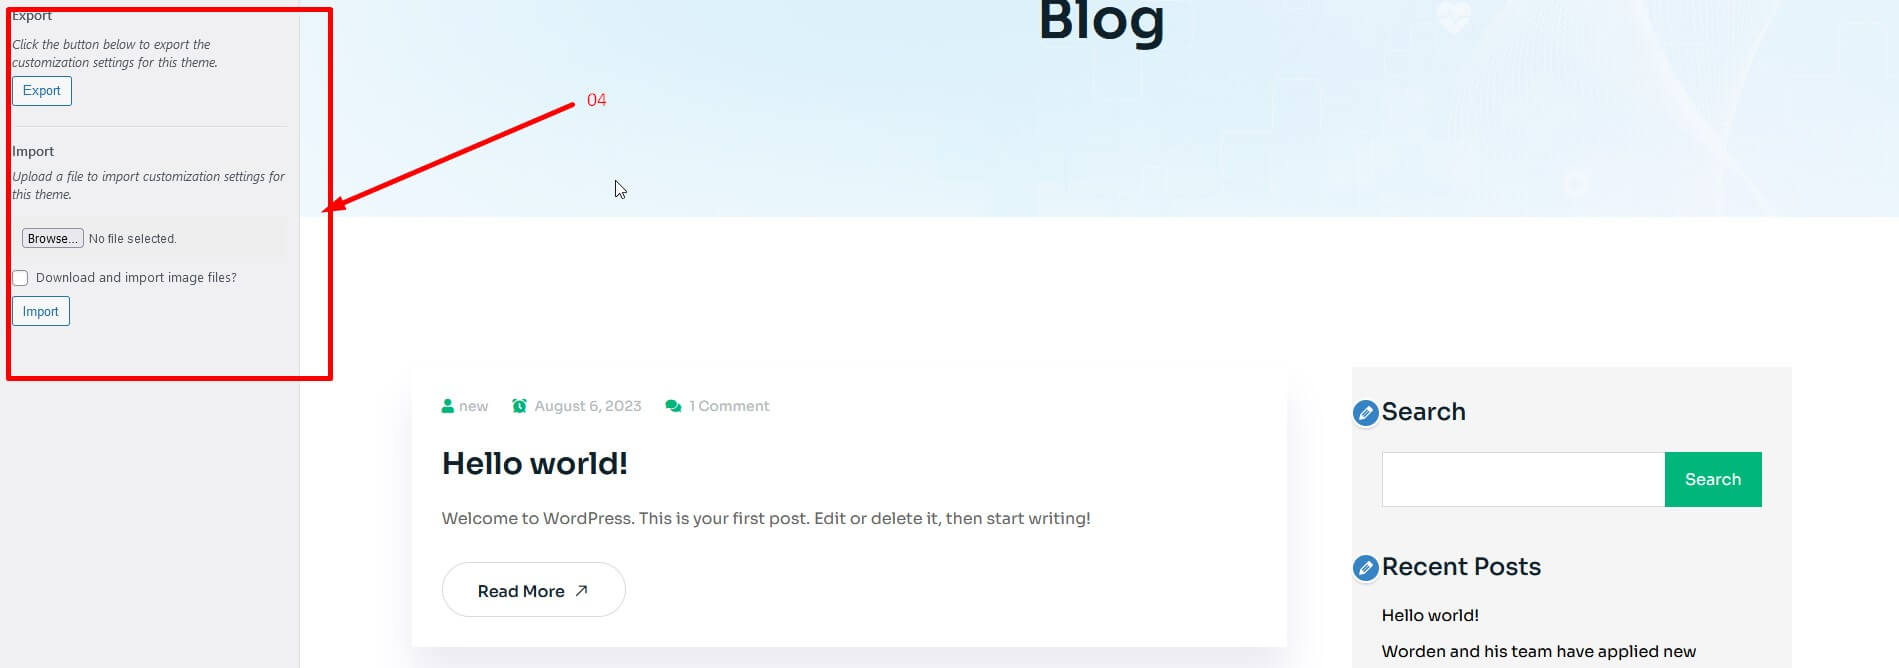
Install the Customizer Export Import plugin to import Customizer settings.
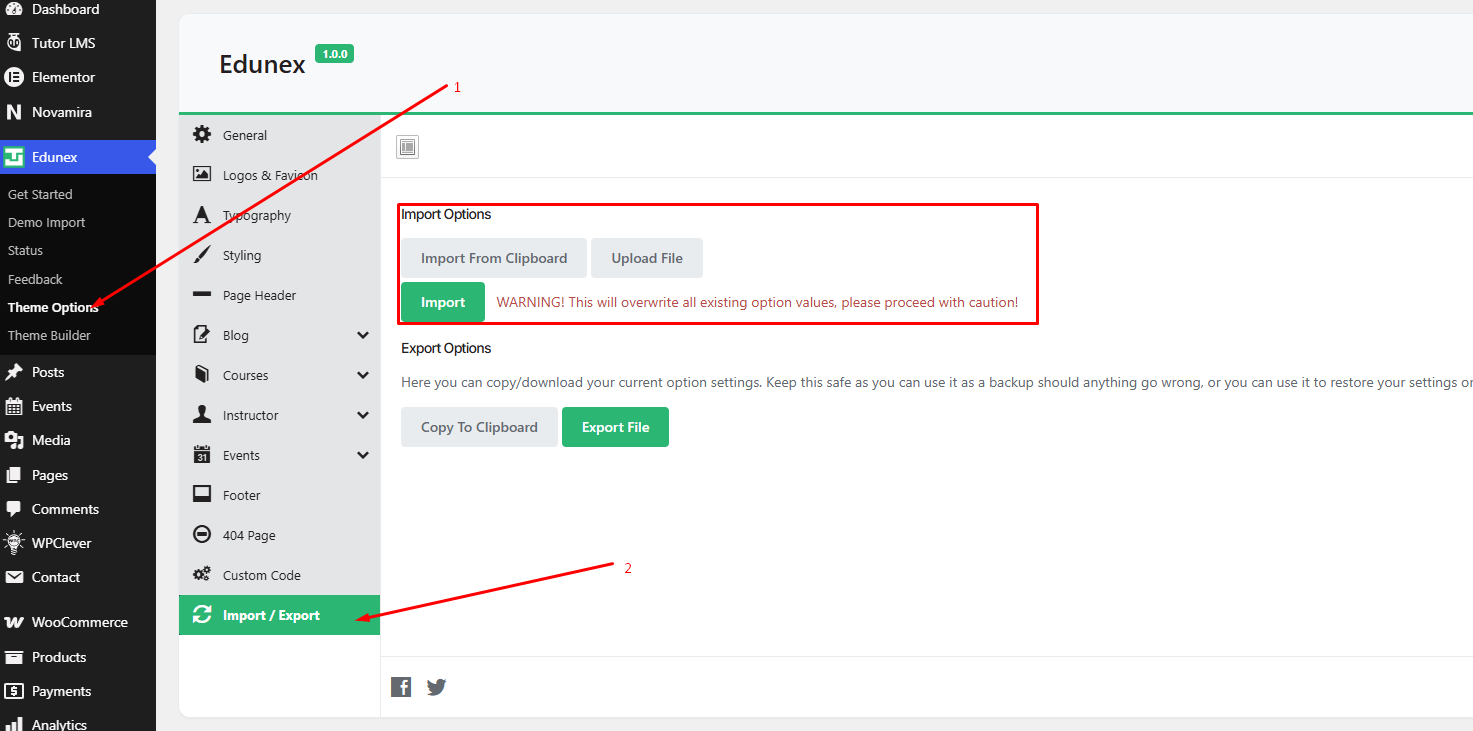
Appearance Customize Export/Import Import Choose file -> customizer-data.dat -> checked Import - Importing Redux Options : From the dashboard, navigate to Edunex Theme Options Import/Export Upload file -> redux-options.json Import
Importing Contents:
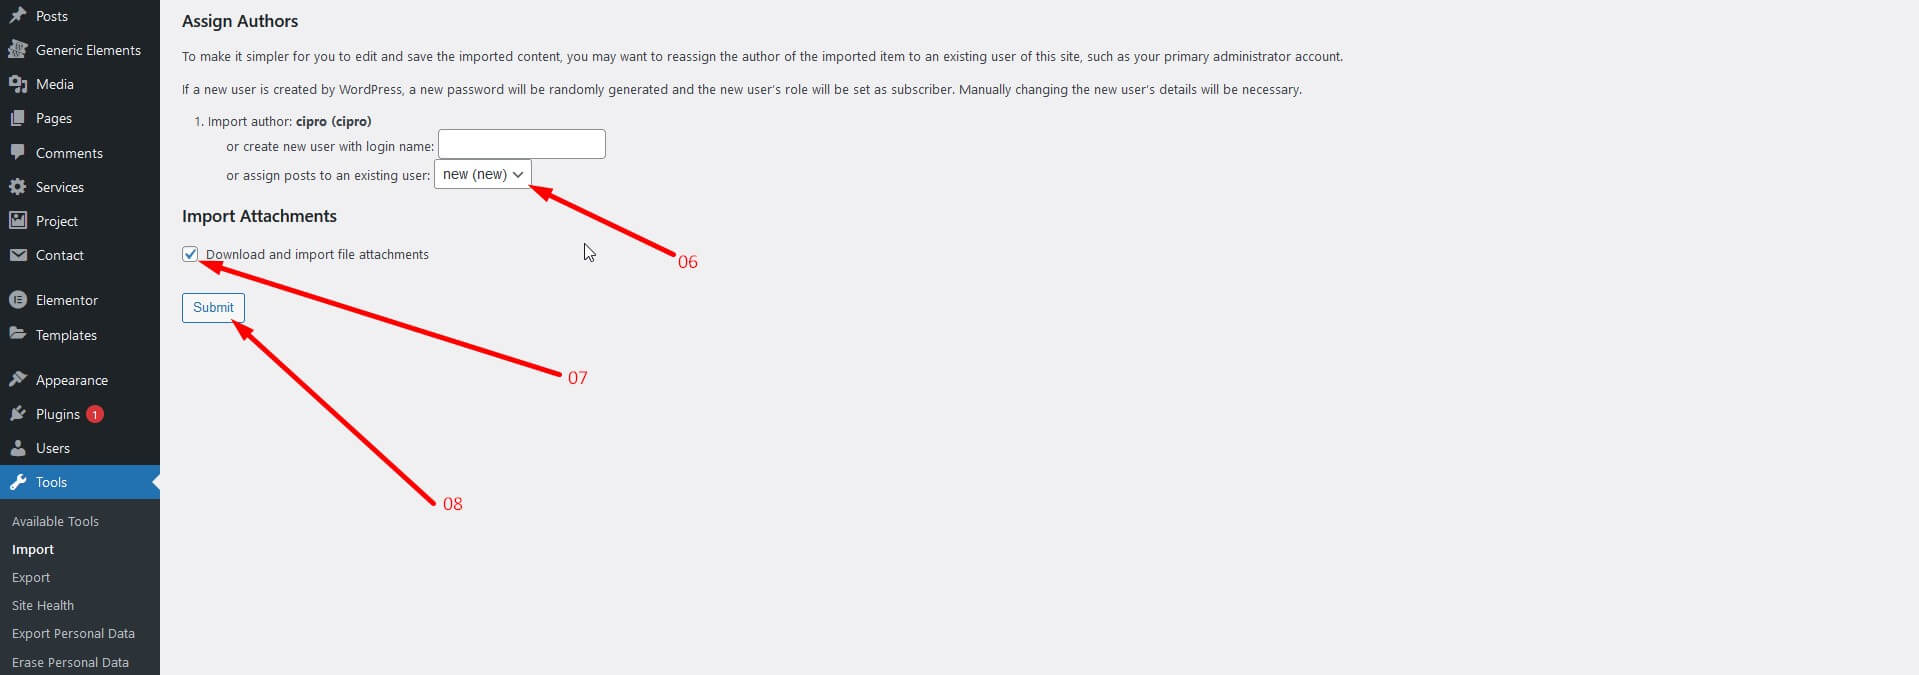
Importing Widgets:
Importing Customizer options:
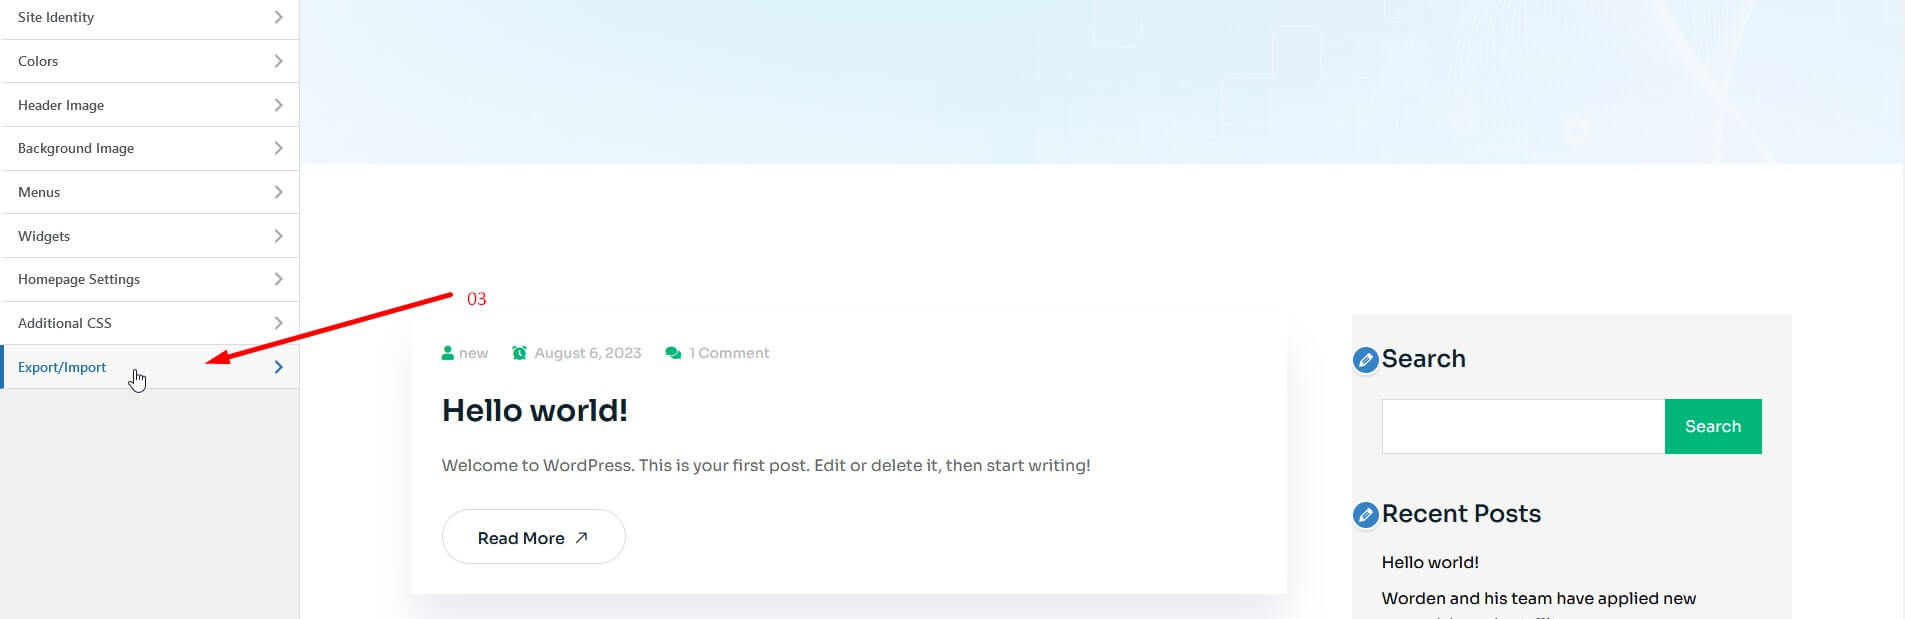
Redux Options:
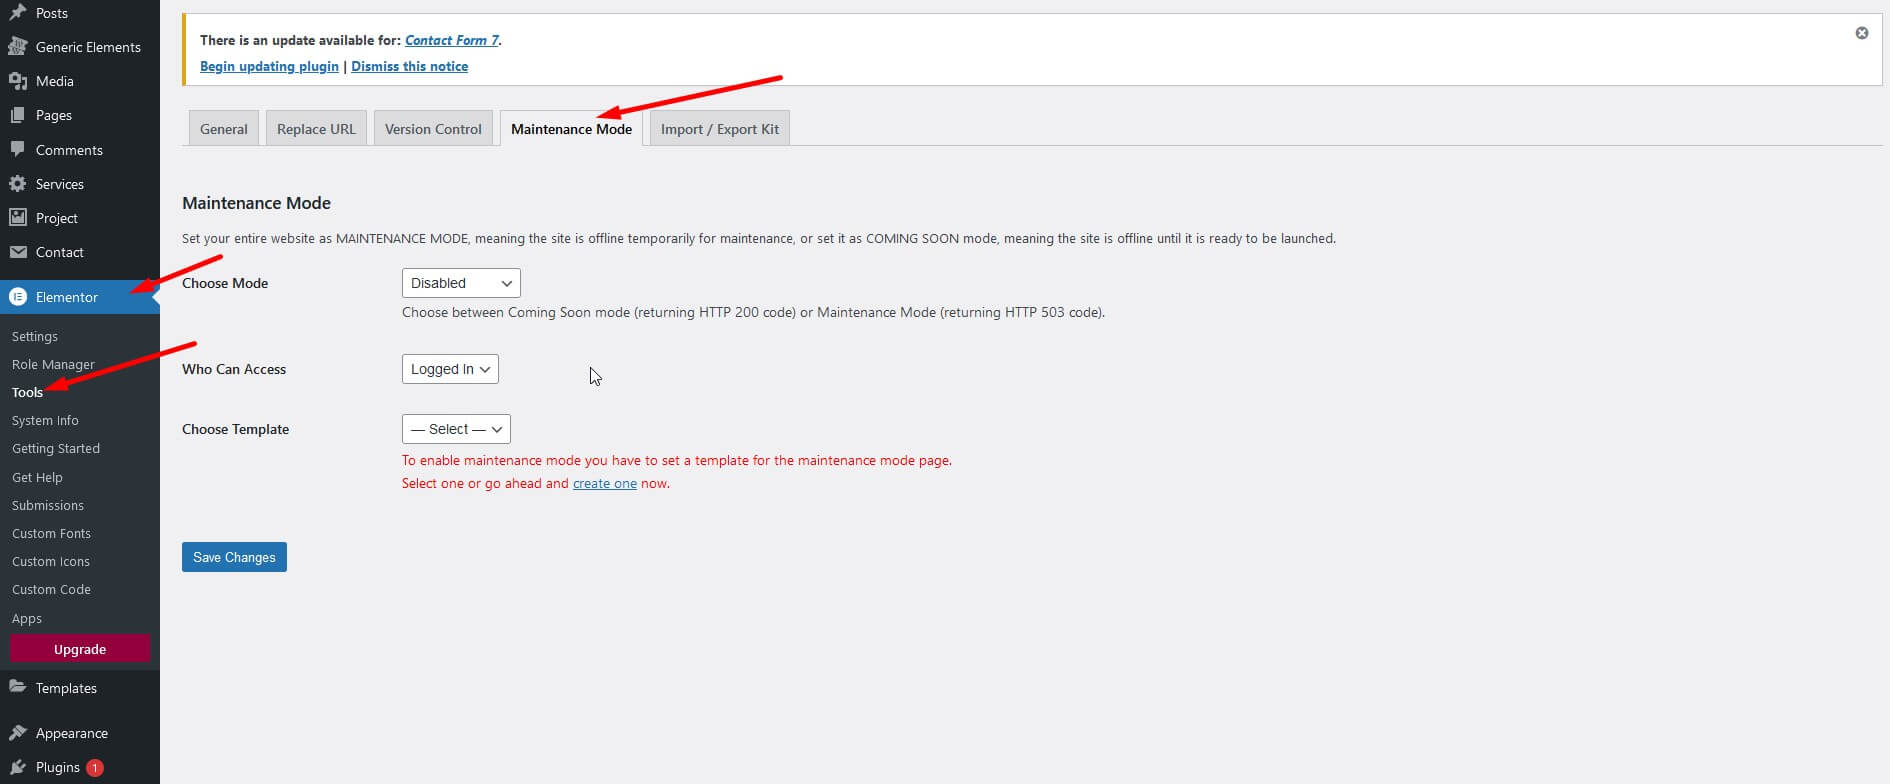
Turn on Coming Soon/Maintenance Mode:
To Enable Maintenance Mode: Learn how you can use it. https://elementor.com/blog/wordpress-maintenance-mode/
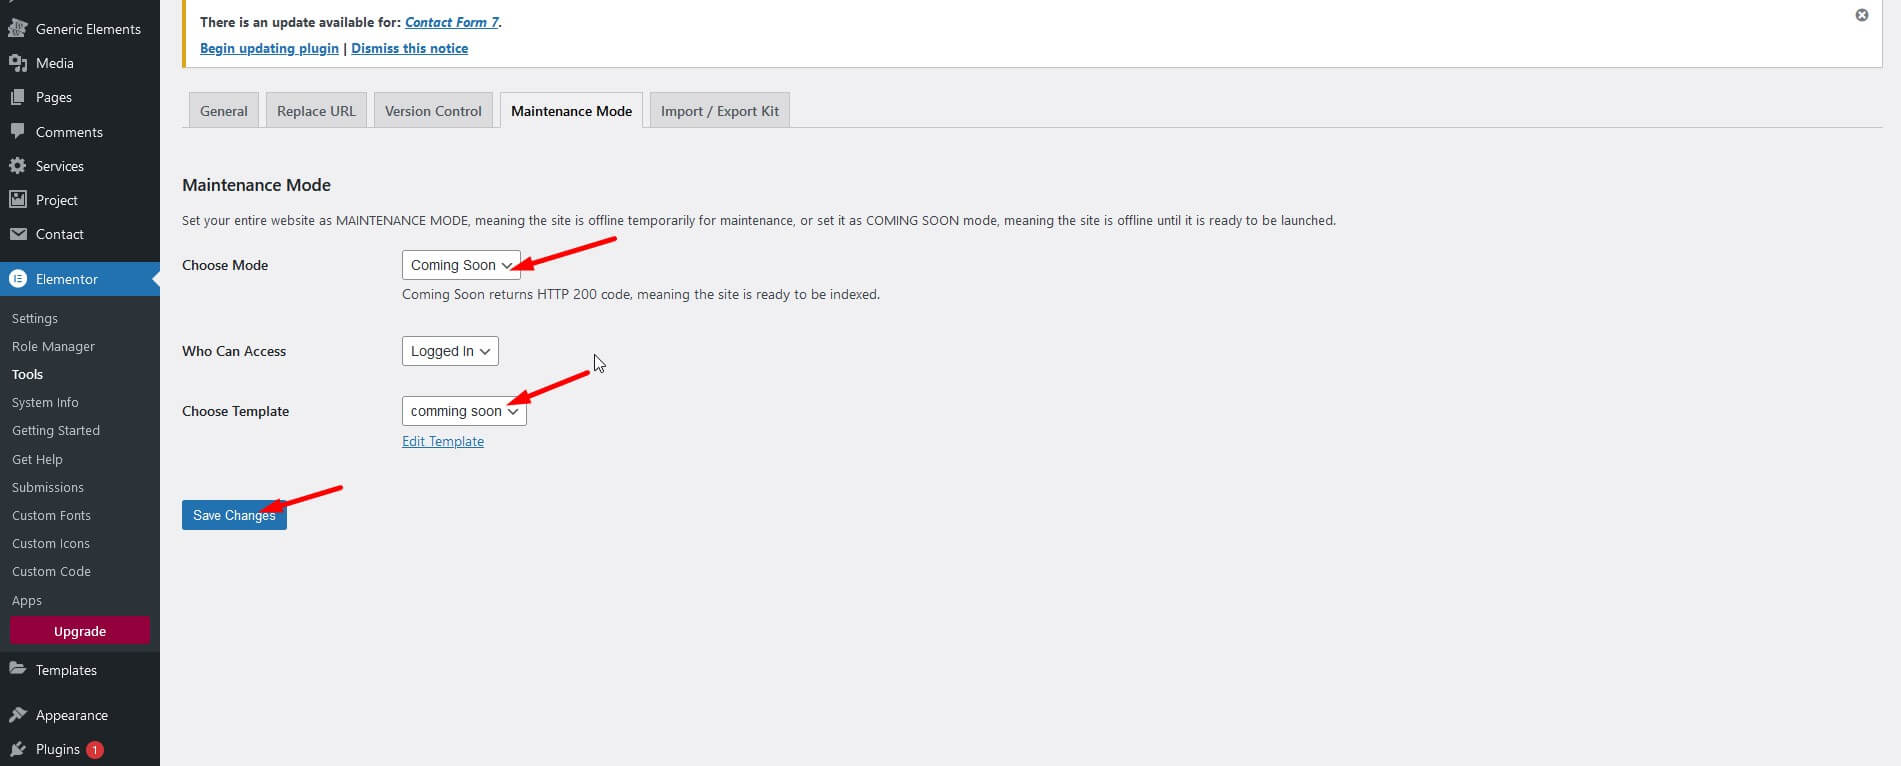
- Navigate to Dashboard Elementor Tools Maintenance Mode
- Choose between Coming Soon and Maintenance Mode
- Set the template for the Coming Soon Mode. Template name "Coming Soon"
Note: You will see a red button on the top WordPress admin bar labeled “Maintenance Mode ON”.
Basic Site Setting
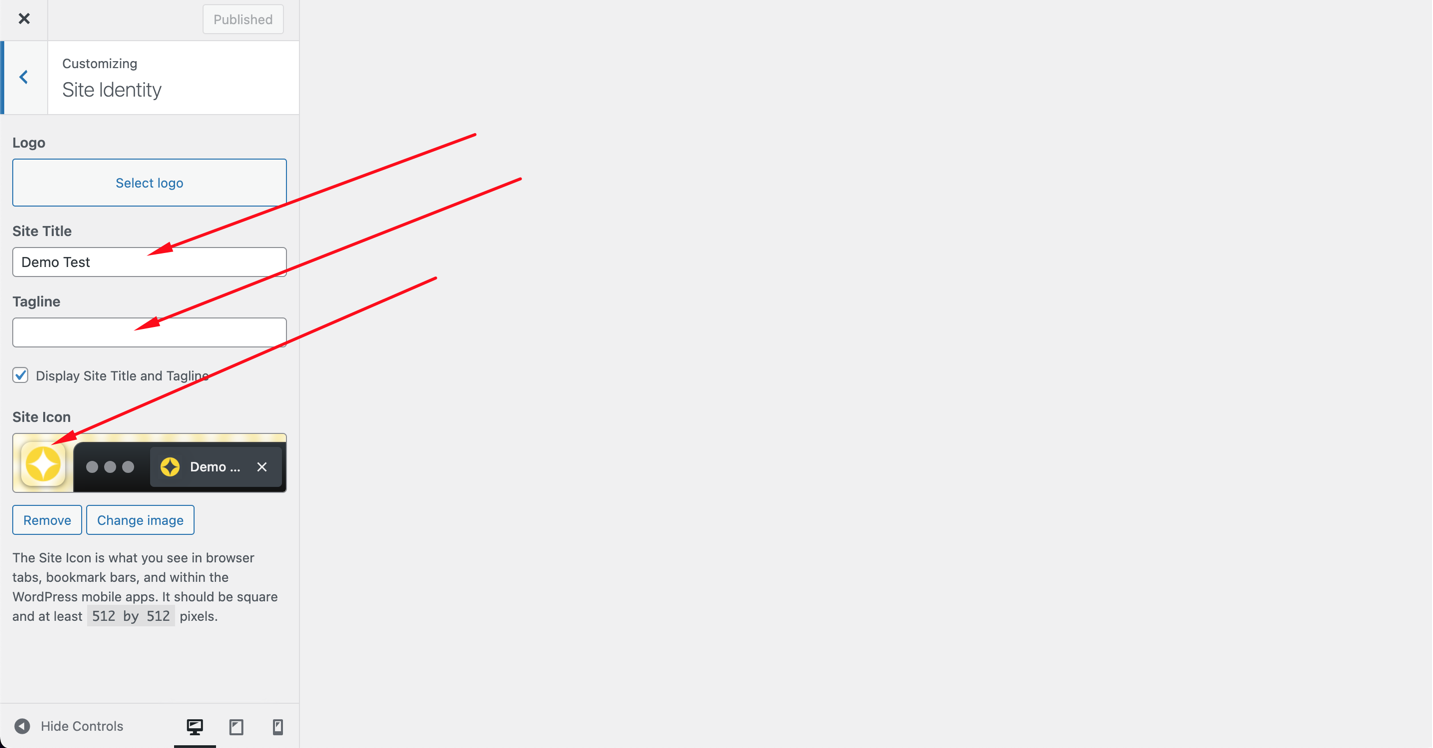
Change Site Title and Favicon:
To change the Site Title and Favicon, navigate to: Dashboard Appearance Customize Site Identity
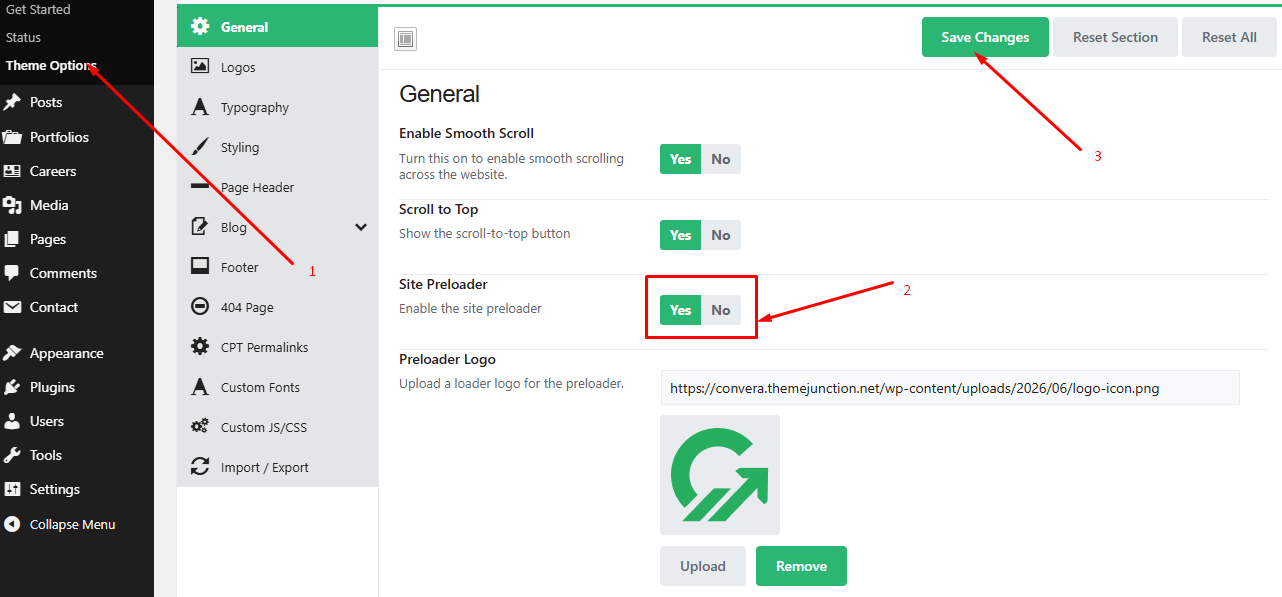
Preloader On/Off:
You can enable or disable the preloader by navigating to: Dashboard Edunex Theme Options General General Settings
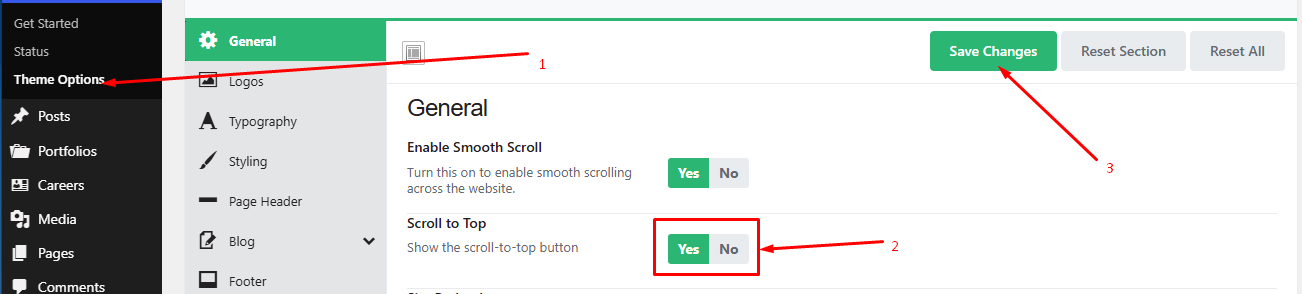
Back to Top On/Off:
You can enable or disable the “Back to Top” button by navigating to: Dashboard Edunex Theme Options General General Settings
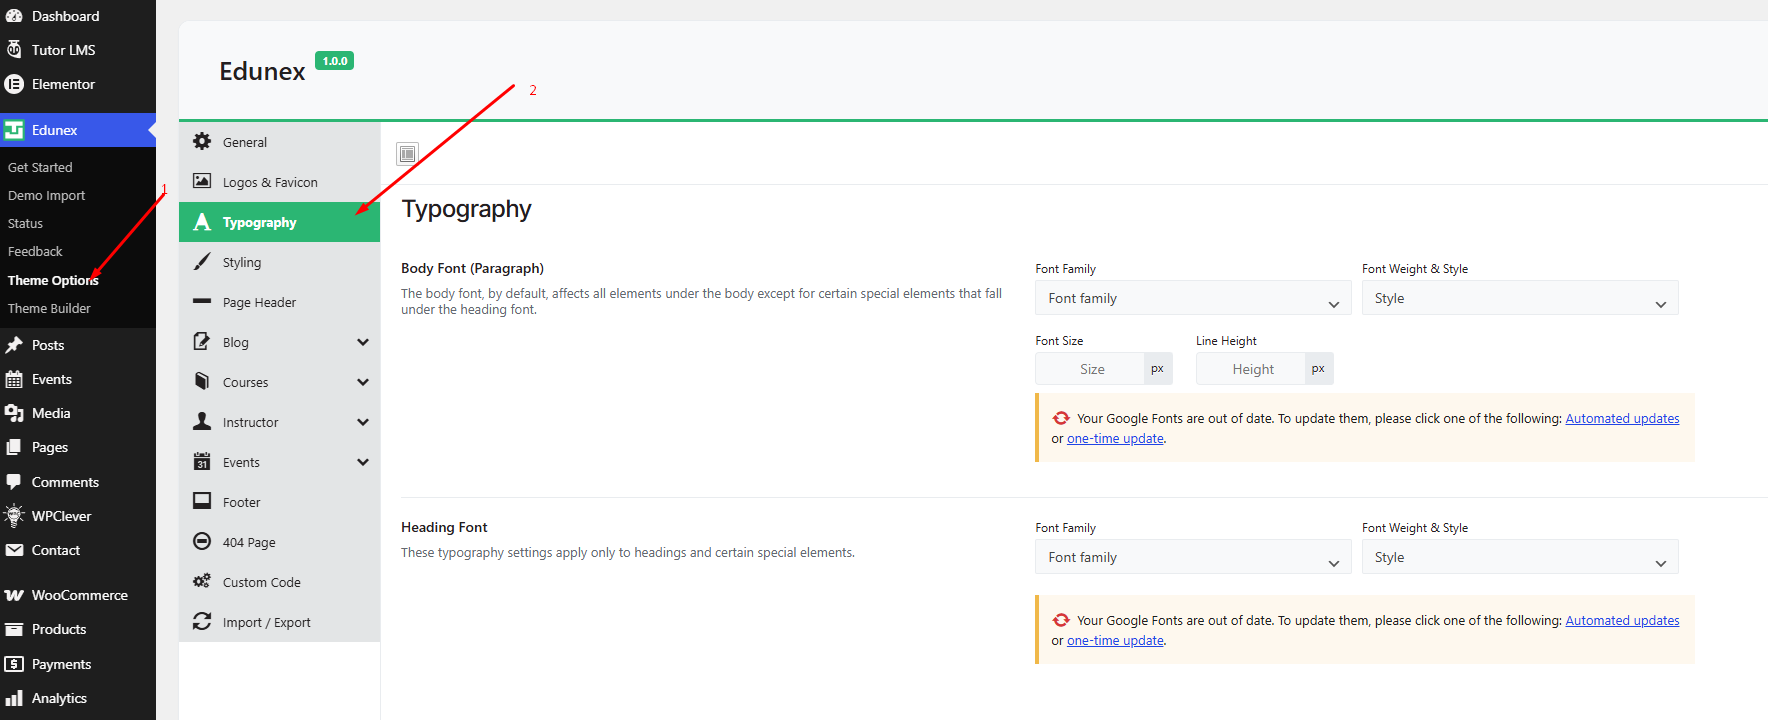
Typography Settings:
You can customize the fonts and typography of your site by navigating to: Dashboard Edunex Theme Options Typography
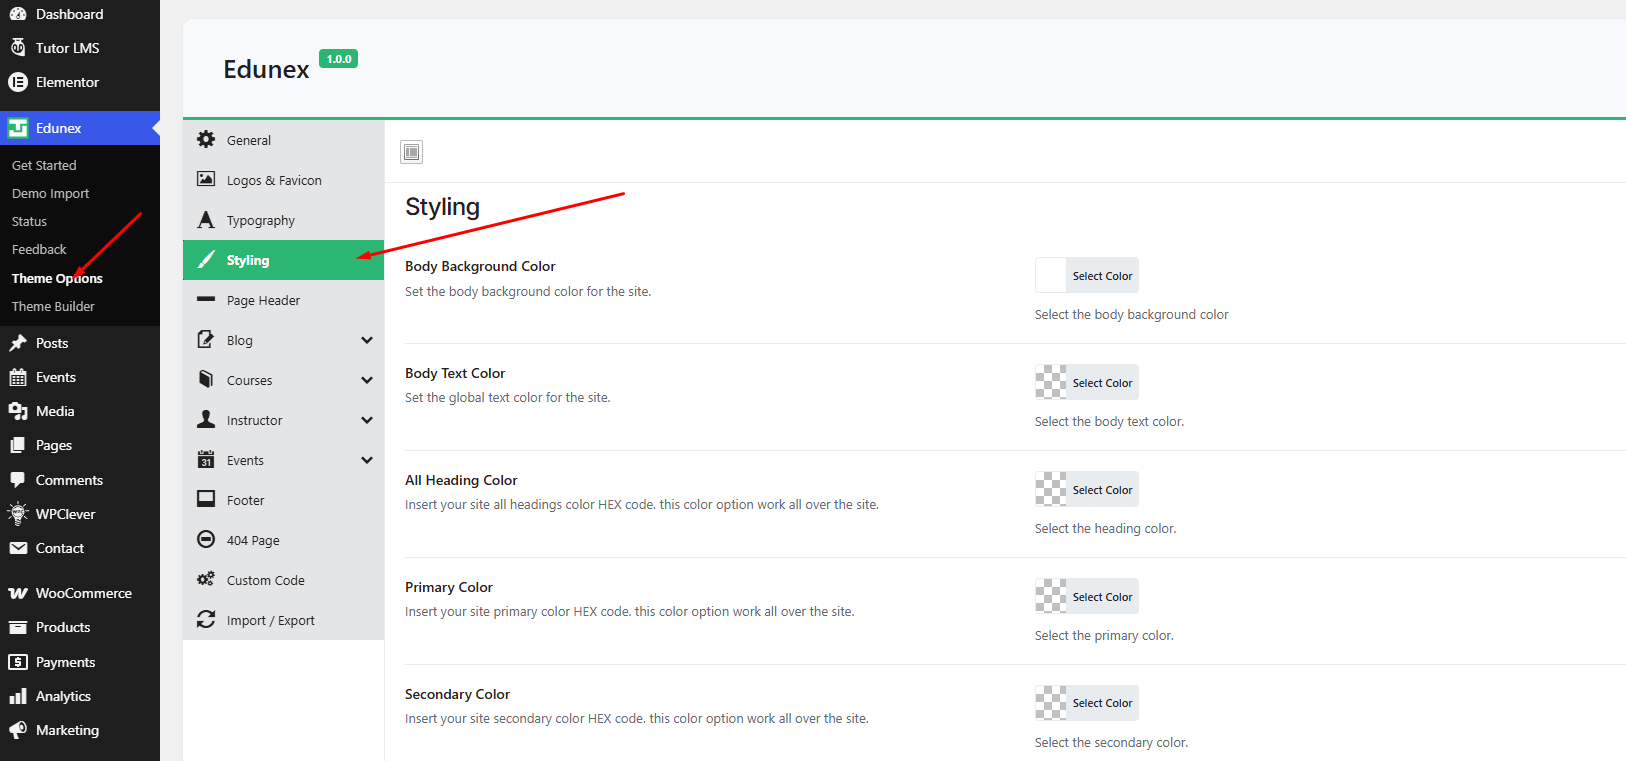
Color Settings:
You can customize the colors of your site by navigating to: Dashboard Edunex Theme Options Styling
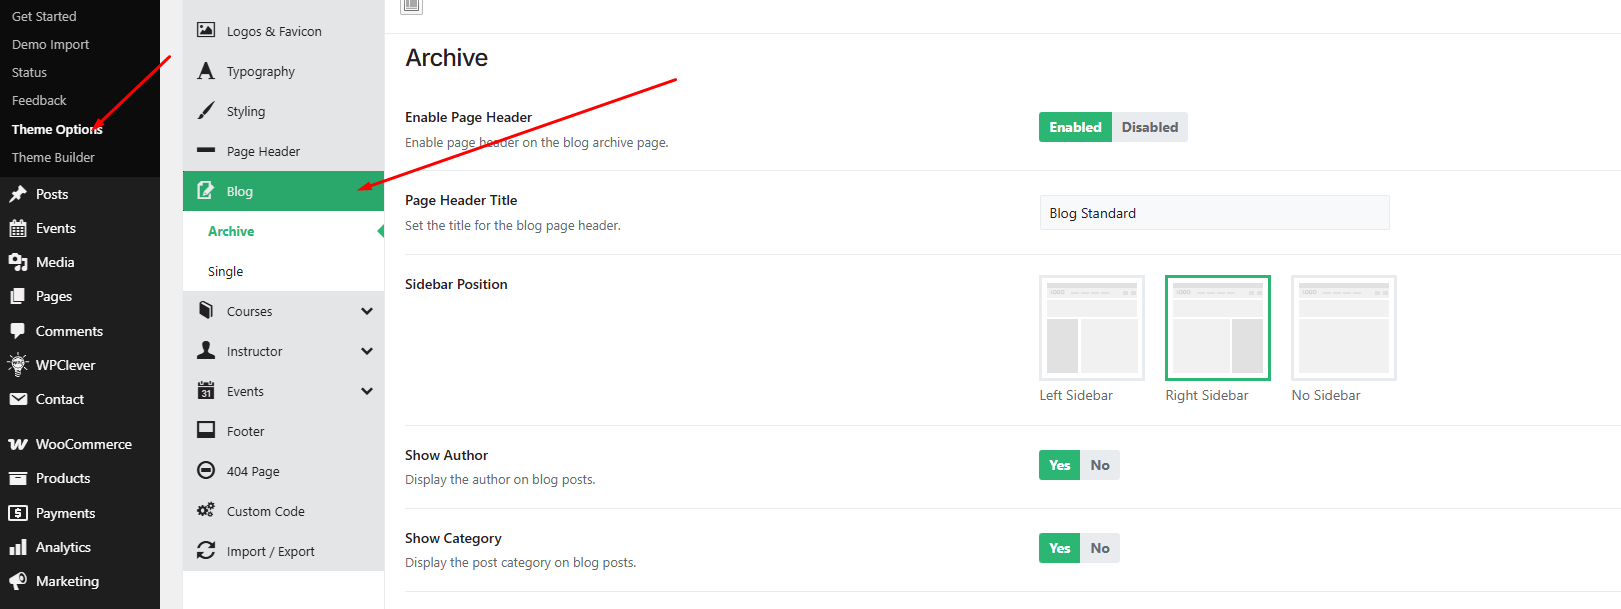
Blog Settings:
You can configure your blog layout and display options by navigating to: Dashboard Edunex Theme Options Blog
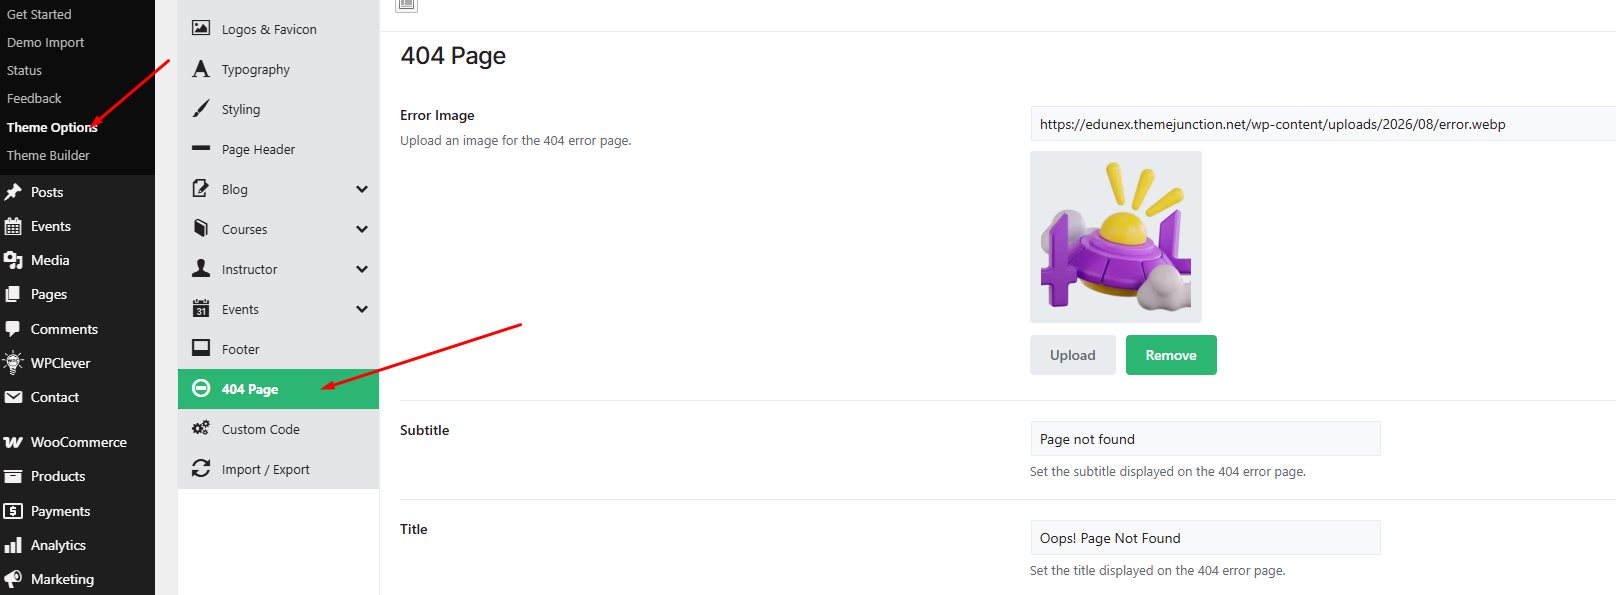
404 Page Settings:
You can customize the appearance and content of your 404 error page by navigating to: Dashboard Edunex Theme Options 404 Page
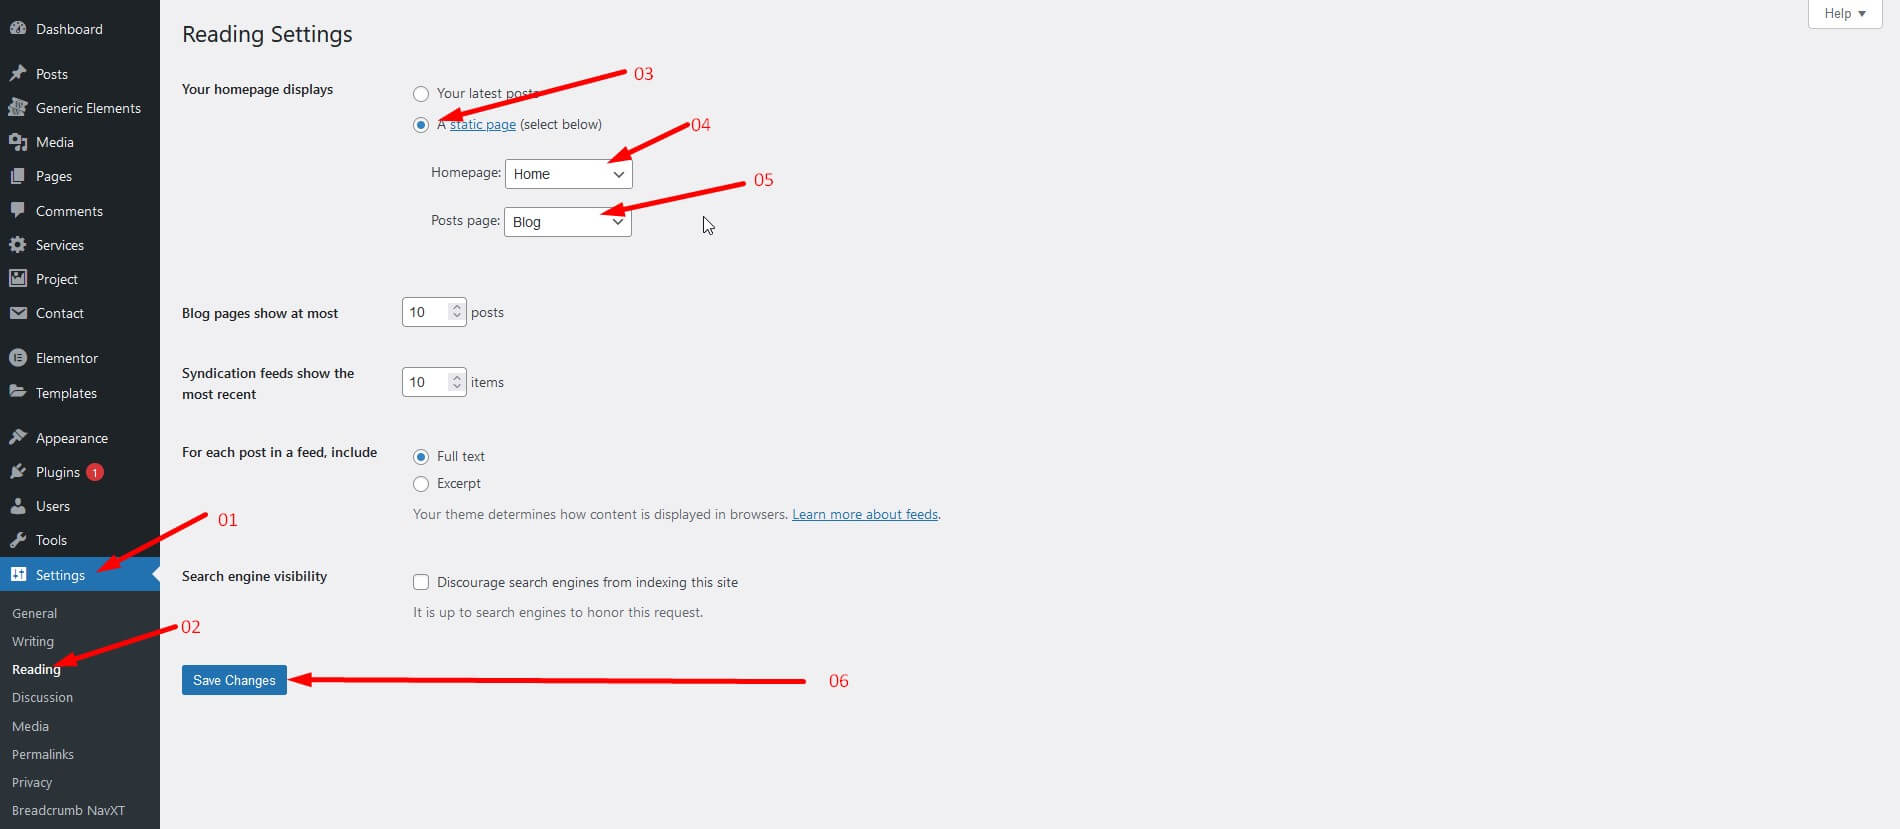
Home and Blog Page Settings:
You can assign and configure your home and blog pages by navigating to: Dashboard Settings Reading
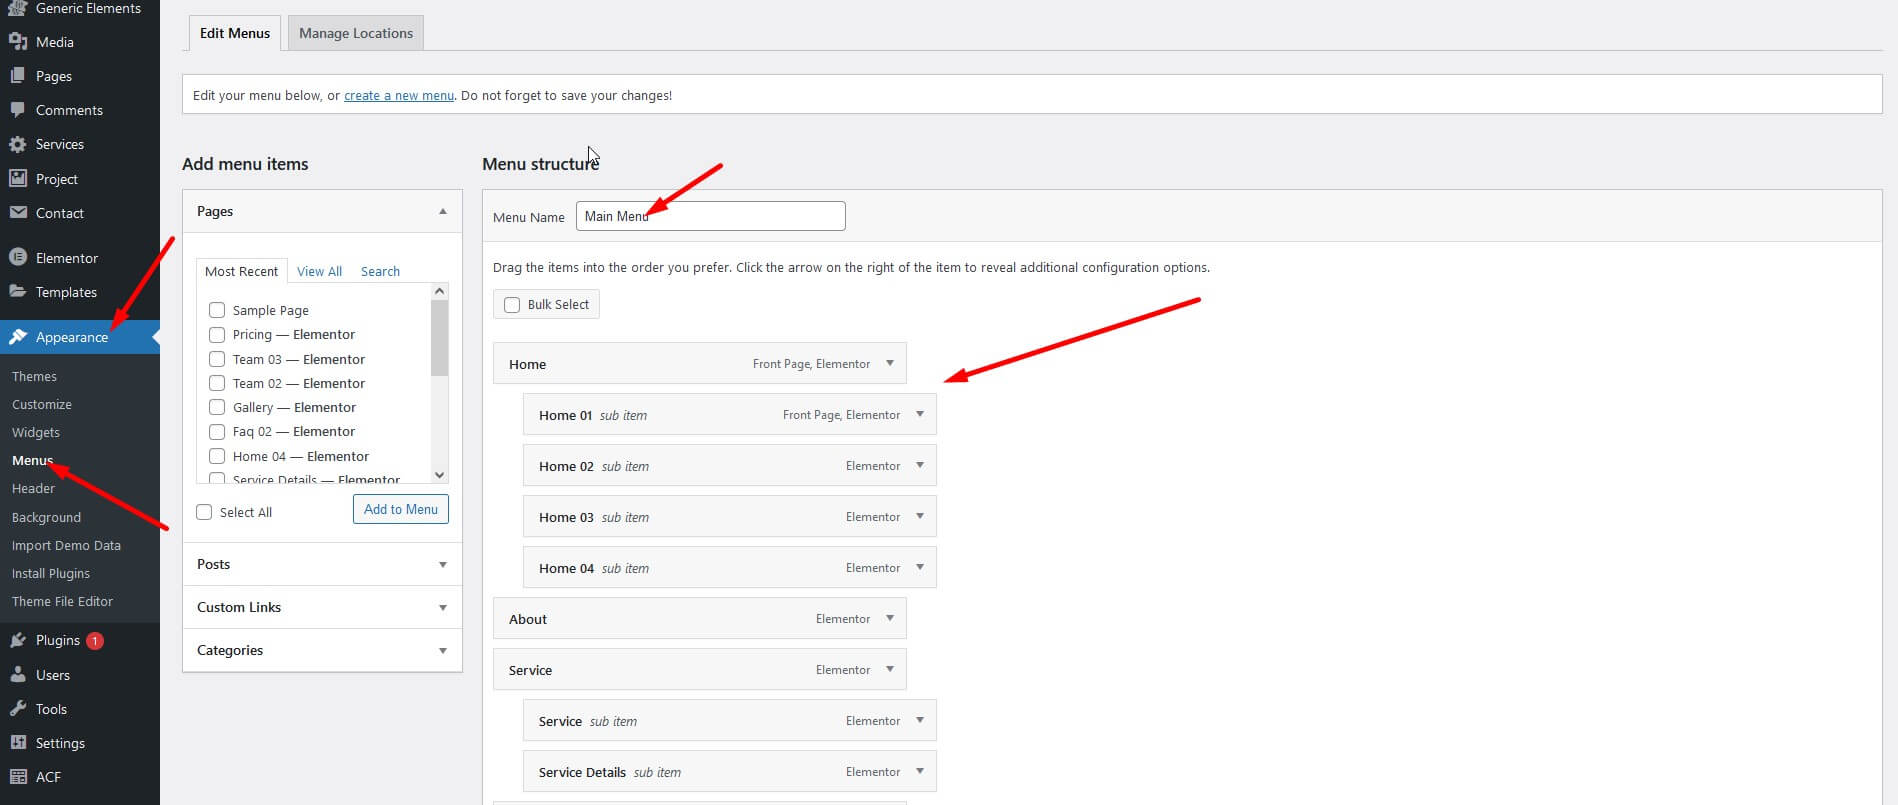
Customize Menu:
You can create and manage your website menus by navigating to: Dashboard Appearance Menus
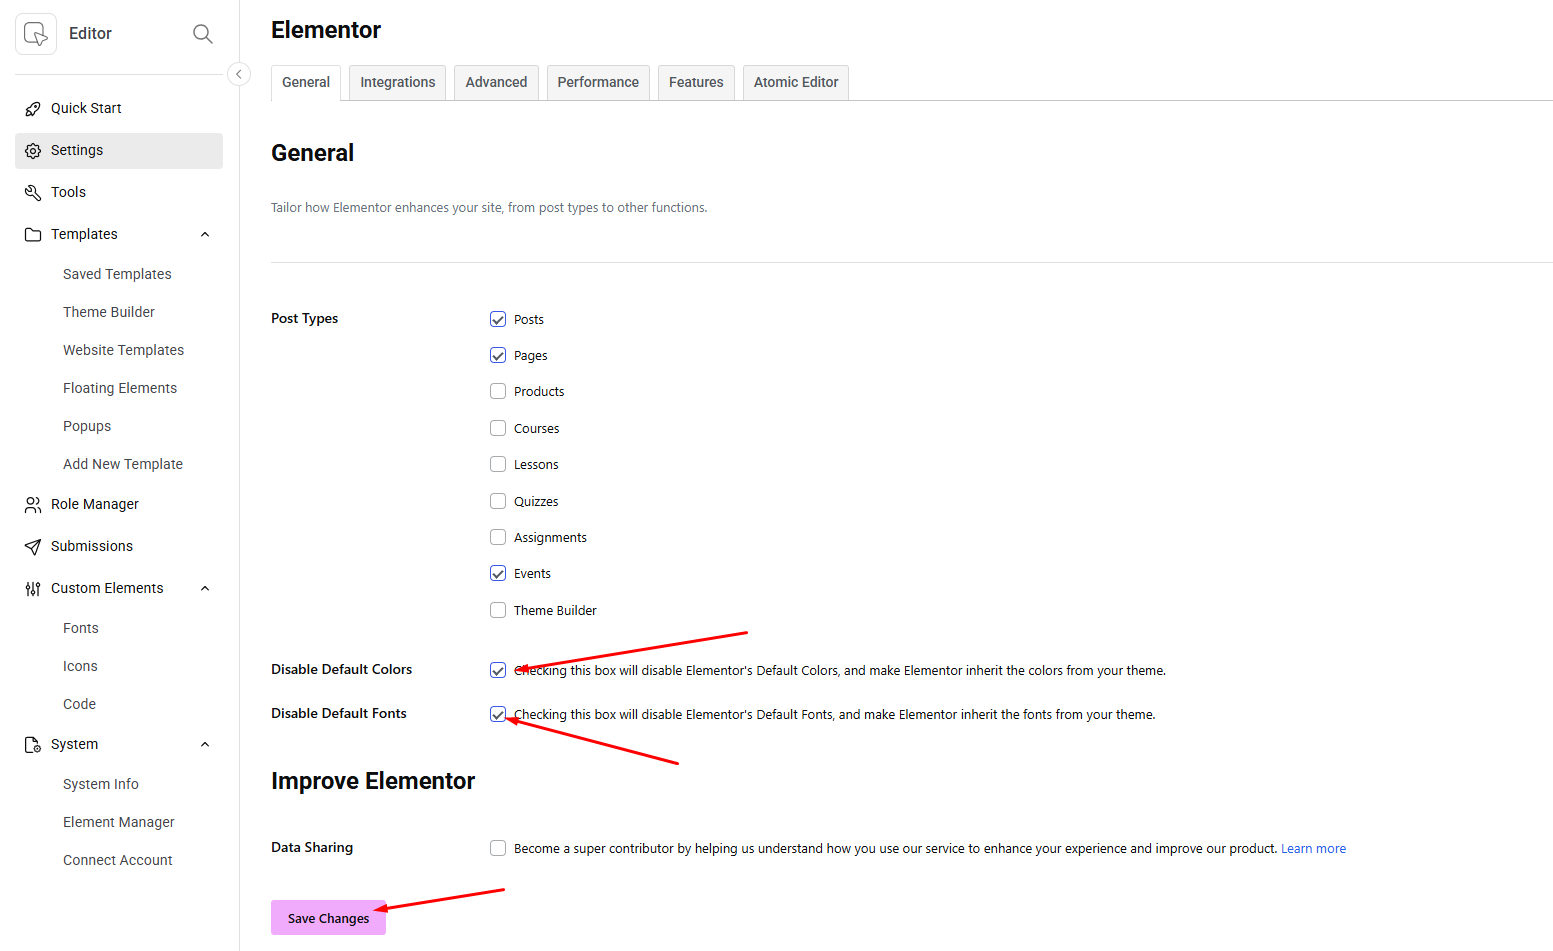
Elementor Options:
Disable Elementor Default Colors & Fonts:
To disable Elementor’s default colors and fonts, navigate to: Dashboard Elementor Settings General Checked both Check both options to disable default colors and fonts.
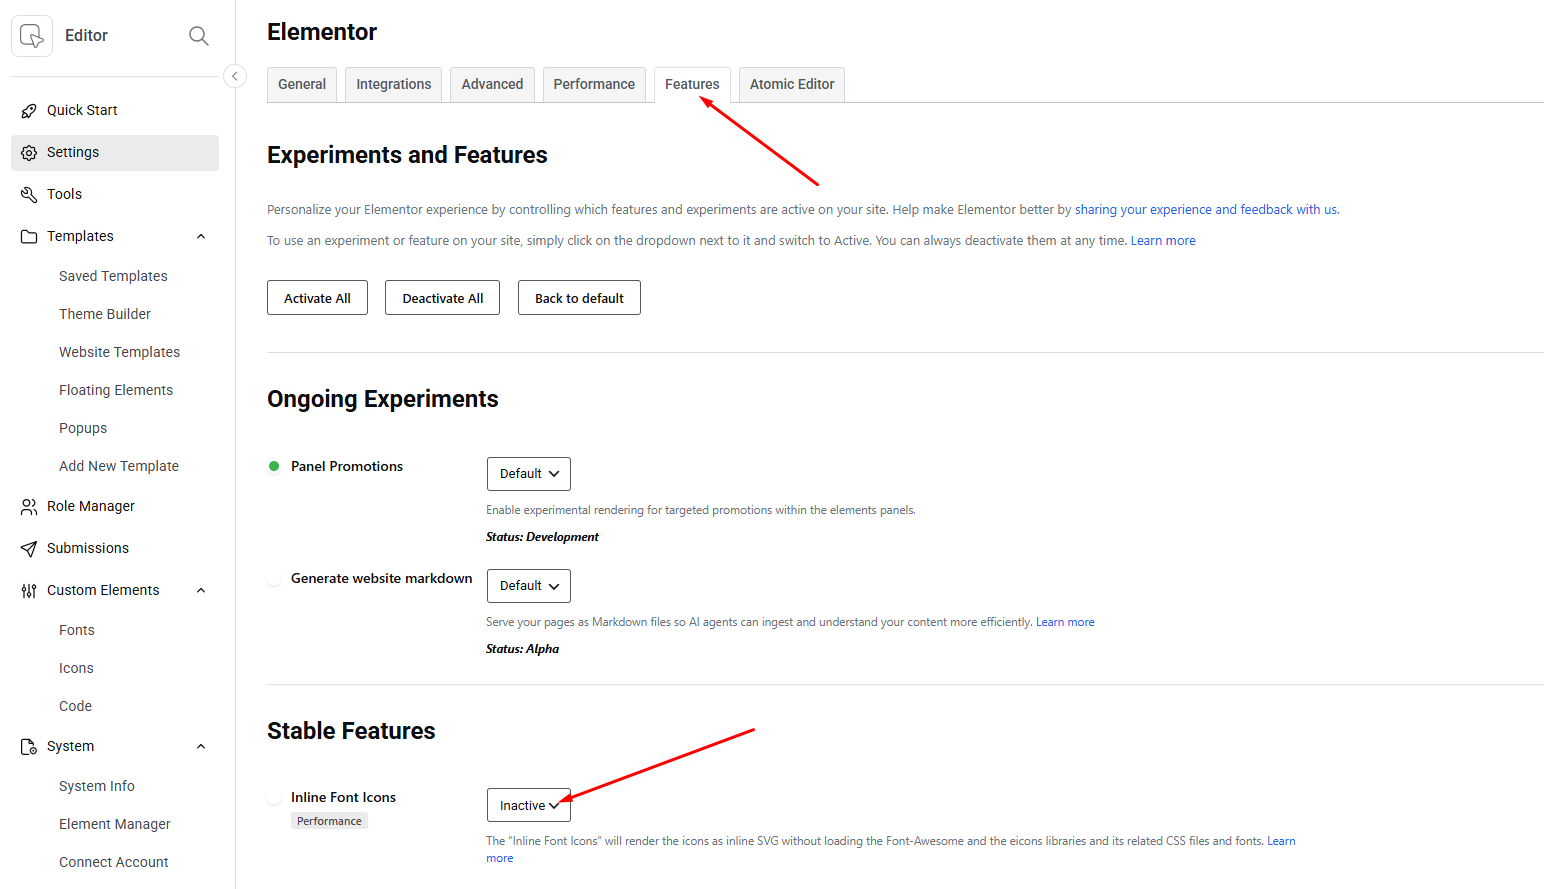
Elementor Font Awesome Icons:
If Font Awesome icons are not displaying properly or styles are not applied (e.g., showing as SVG icons):
Navigate to: Dashboard Elementor Settings Features Inactive -> Inline Font Icons
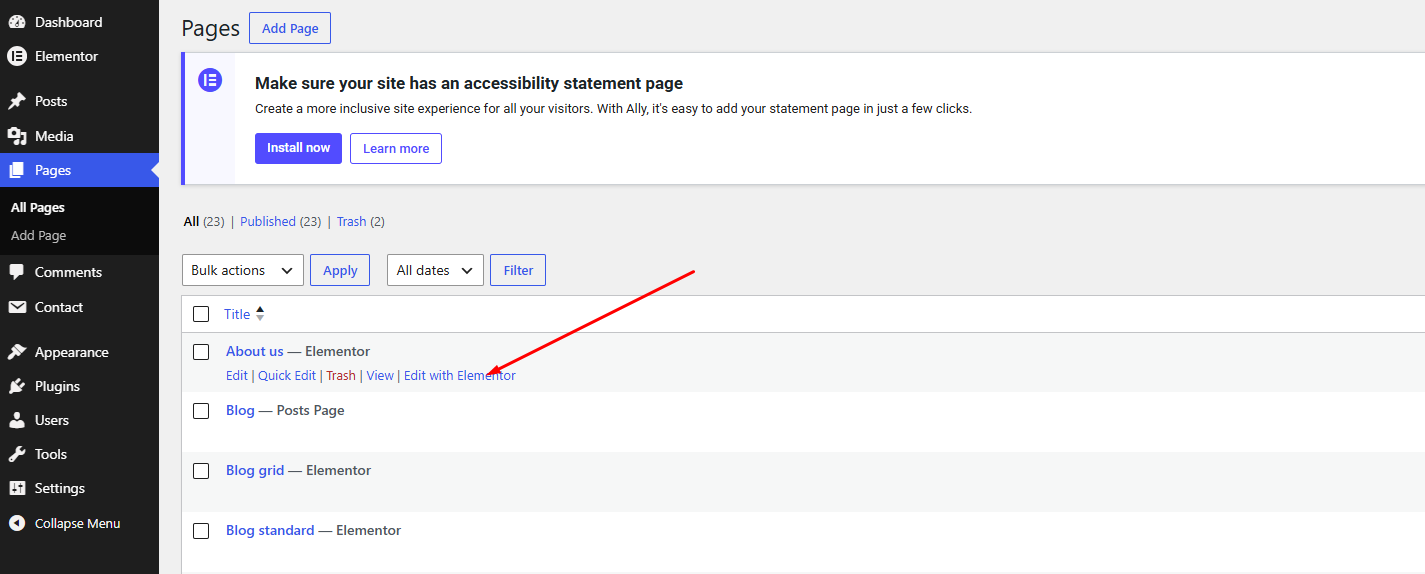
Customize Elementor Width:
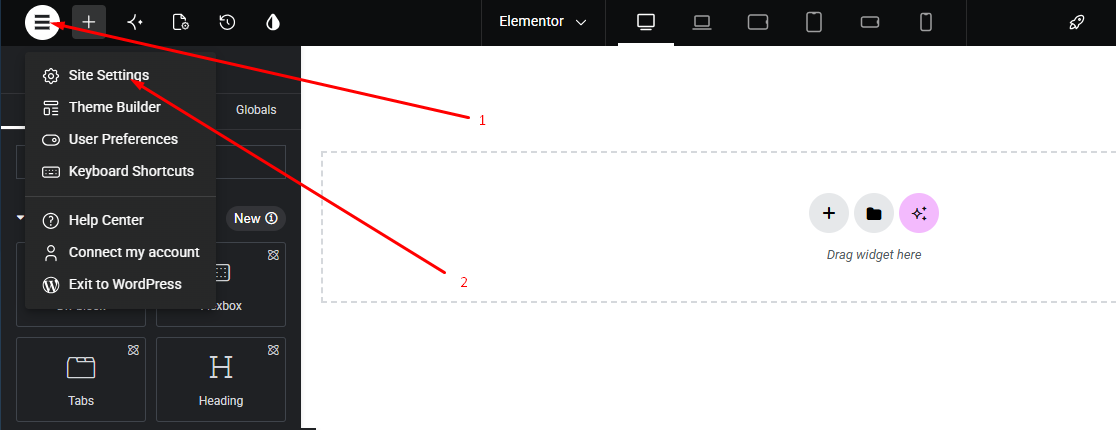
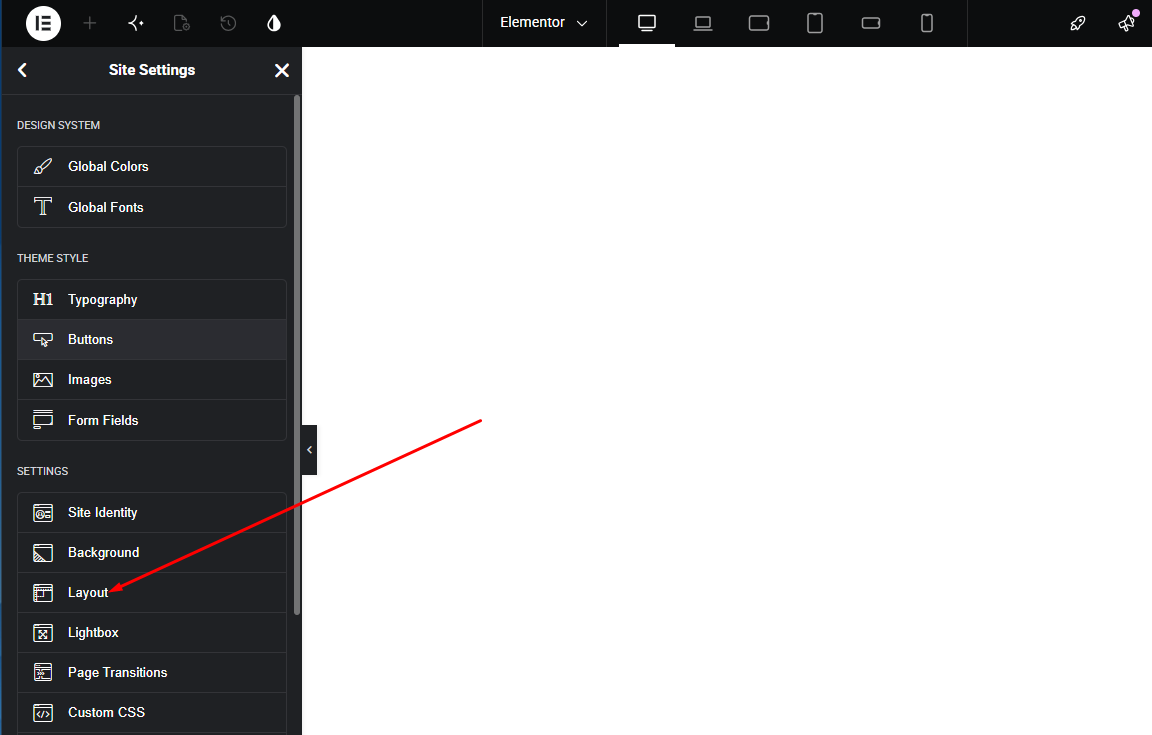
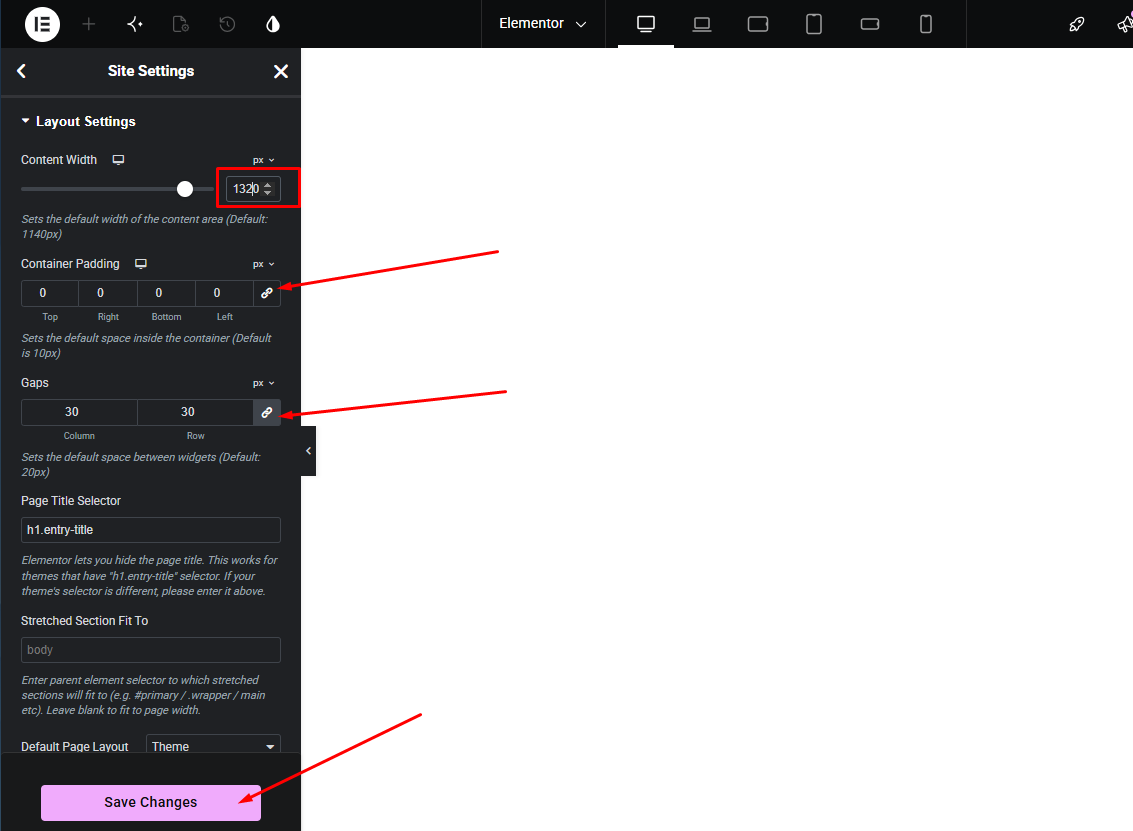
To Customize Elementor Content Width Navigate to: Dashboard Pages Home(Edit with elementor) Let Top Bar Site Settings Layout Change Content width, container padding & gaps
Enable Elementor for Custom Post Types:
- Navigate to Elementor Editor Settings General from the WordPress admin dashboard menu.
- In the Post Types field, select the post types where you want to enable Elementor.
- Click the Save Changes button to apply your settings.
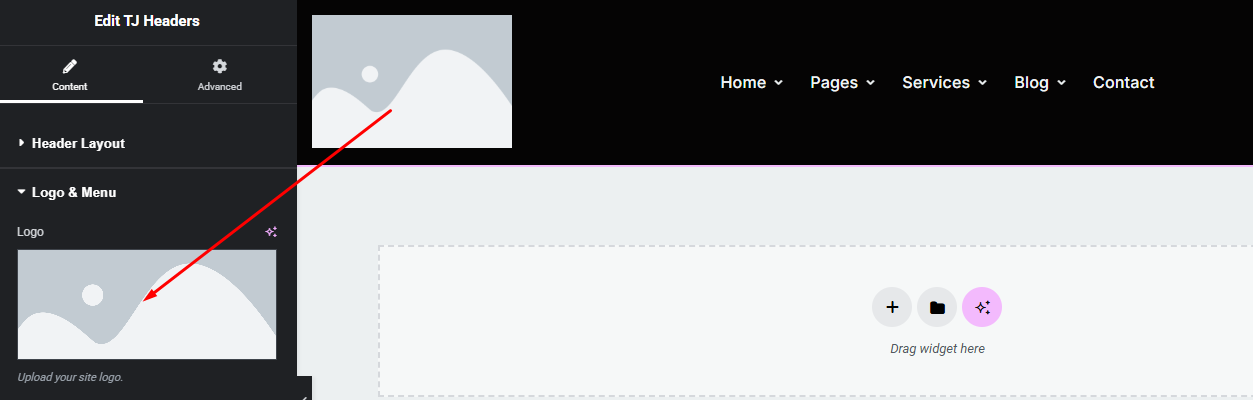
Change Site Logo:
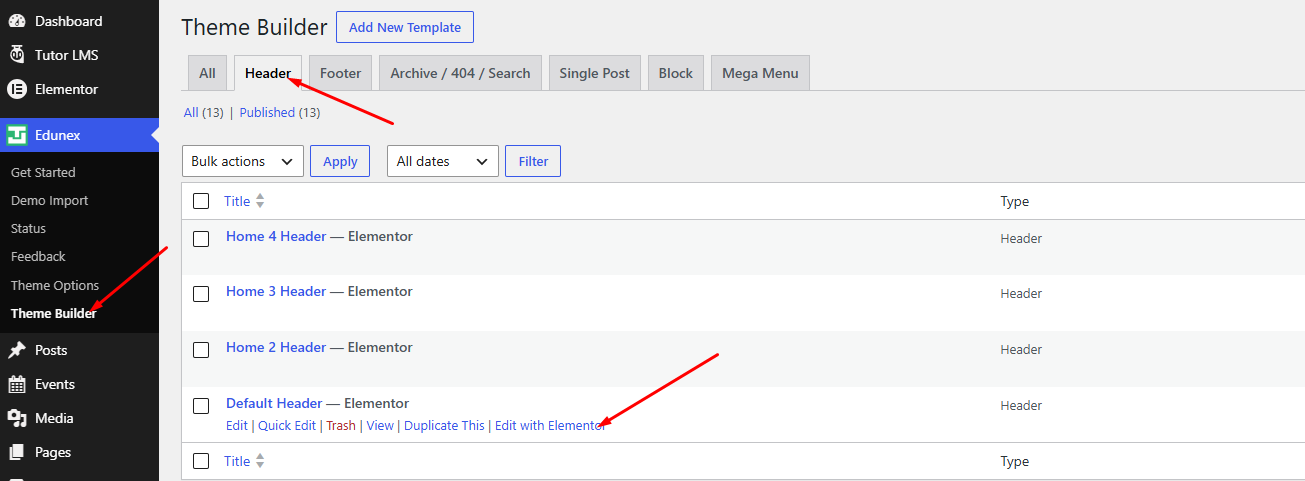
To change Site Logo navigate to: Dashboard DesignSuite Theme Builder Header Default Header (open with elementor) and follow the following steps:
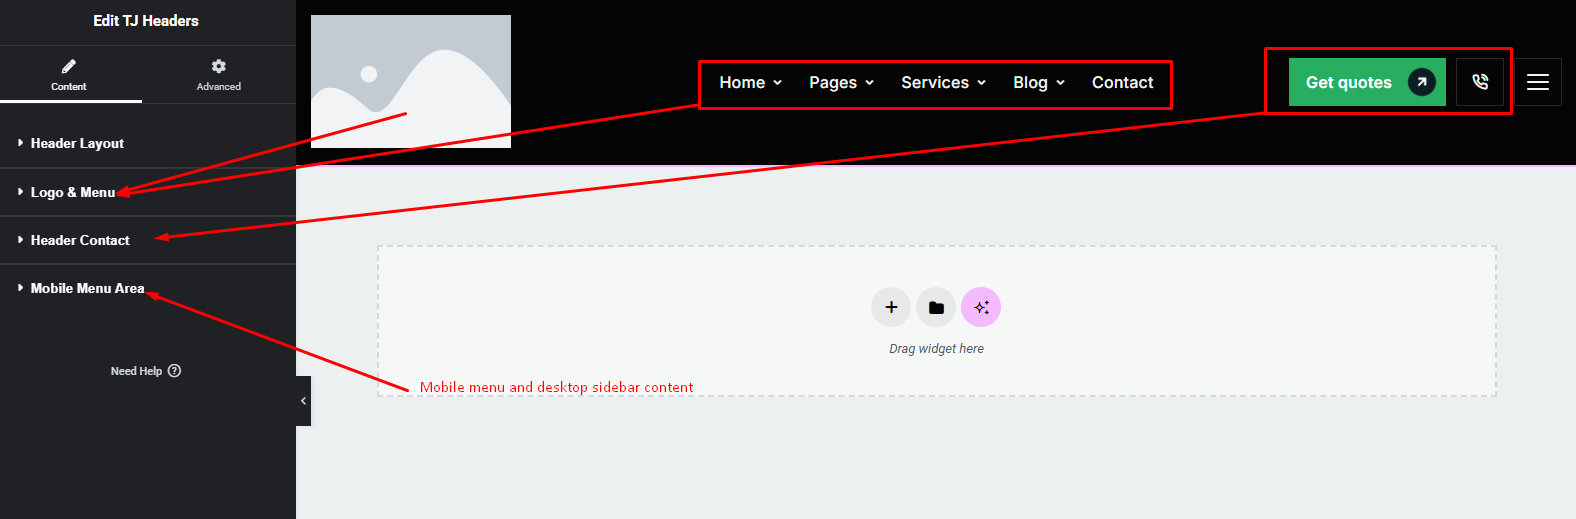
Edit Header:
To customize Header navigate to: Dashboard DesignSuite Theme Builder Header Which page you want (open with elementor) and follow the following steps:
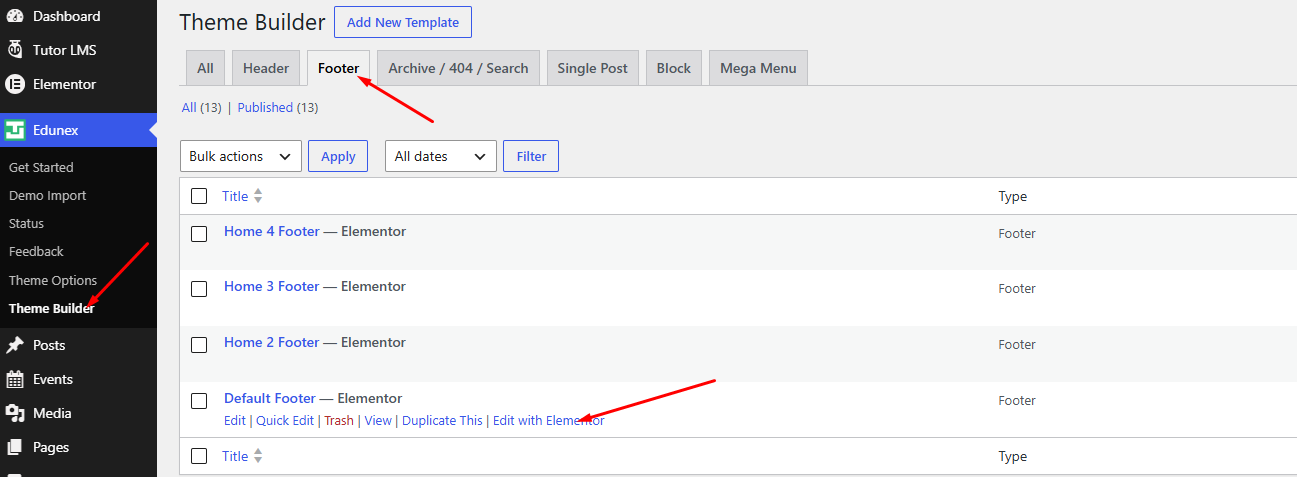
Footer:
To customize Footer navigate to: Dashboard DesignSuite Theme Builder Footer Which footer you want (open with elementor) and follow the following steps:
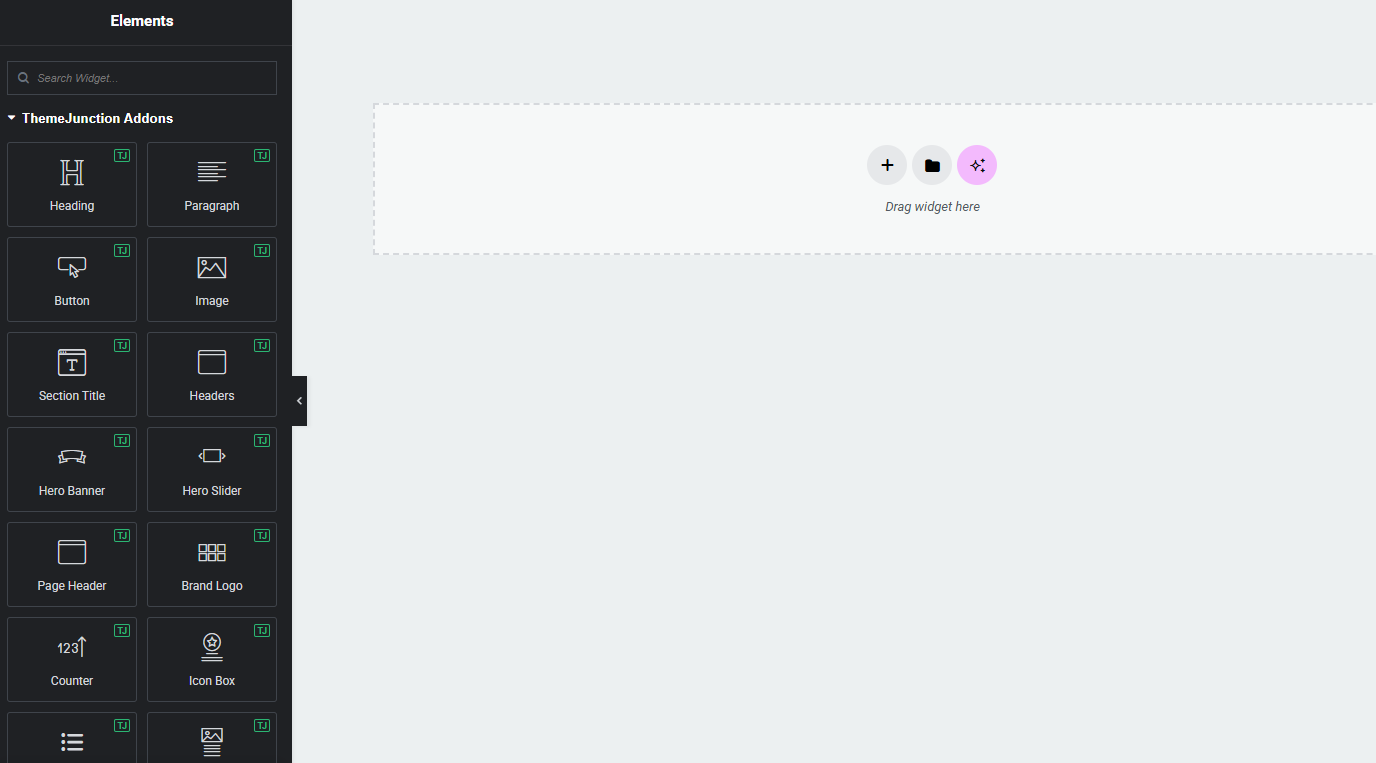
Elementor Widgets:
Elementor Page Builder comes with many built-in widgets by default. In addition, we have created 50+ custom Elementor widgets to enhance your website’s functionality. You can find these widgets under the ThemeJunction Addons section when editing a page with Elementor.
Course Options:
Edunex is a full Learning Management System (LMS) theme built on top of the free Tutor LMS plugin. Courses, lessons, quizzes, instructors, enrollment, and payments are all powered by Tutor LMS, while Edunex replaces the default Tutor pages (course archive, single course, instructor profile and login) with its own custom-designed, fully responsive templates. Everything below is configured from Dashboard Edunex Theme Options Courses
Tutor LMS Documentation:
To use the course features of the theme, the Tutor LMS plugin must be installed and activated. It is bundled with the theme and listed on the required plugins screen, so if you followed the Plugin Installation step it is already installed. You can optionally add Tutor LMS Pro for advanced add-ons (certificates, extra monetization, etc.), but it is not required for the theme to work.
Edunex automatically overrides the Tutor course archive, single course, instructor profile and login templates. You do not need to add any shortcode or build these pages manually — simply create your courses and the theme handles the presentation.
Getting started with Tutor LMS:
- Make sure Tutor LMS is activated from Plugins Installed Plugins
- Run the Tutor setup wizard and configure global options from Dashboard Tutor LMS Settings Here you can enable/disable Course Reviews, Q&A, Announcements, the public Instructor list, monetization (eCommerce engine), and more. Edunex reads these Tutor settings and shows or hides the matching sections automatically.
- Create a course from Dashboard Tutor LMS Courses Add New Add the curriculum (topics, lessons, quizzes, assignments), an intro video, featured image, price, difficulty level, category, tags, FAQs, requirements and intended audience.
- After creating your first course, re-save your permalinks so the course URLs work correctly: Settings Permalinks Save Changes
For in-depth guidance on Tutor LMS itself (course builder, quiz builder, monetization, withdrawals, certificates, etc.), please refer to the official Tutor LMS documentation: https://docs.themeum.com/tutor-lms/
Course Archive:
The Course Archive is the main courses listing page (as well as course category and tag pages). Its layout, filters and card contents are controlled from Dashboard Edunex Theme Options Courses Archive
Archive Layout & Filters:
- Enable Top Space: adds spacing above the page header (useful with a transparent/overlay header). Disabled by default.
- Archive Layout: choose how filters are displayed — Filter Top Bar (filters across the top, full-width grid) or Filter Sidebar (filters in a left sidebar).
- Enable Top Filter: show or hide the top filter/sort bar.
- Enable Sidebar Filter: show or hide the sidebar filter panel (only applies to the Filter Sidebar layout).
- Individual filters: each filter type can be toggled on or off independently — Search, Category, Price, Level, Rating and Instructor.
Archive Header:
Under Courses Archive Header you can edit all of the text shown in the archive page header, including the Page Title (category/tag pages use the term name automatically), the Home and Current breadcrumb labels, the three counter labels (Courses, Instructors, Learners), the Active Filters label and the No Results text.
Course Card:
Under Courses Course Card you control which elements appear on each course card in the grid. Every element can be toggled on or off — Badge, Wishlist, Category, Price, Level, Instructor, Rating and the Button. You can also change the card Button Text (default: Start learning).
Single Course:
The Single Course page is the individual course detail page. Its layout and all of its labels are managed from Dashboard Edunex Theme Options Courses Single
Note: The content tabs (Curriculum, Instructor, Reviews, FAQs, Q&A, Announcements) appear only when the course has that content and the matching Tutor LMS setting is enabled. For example, the Reviews tab is hidden if Course Reviews are disabled in Tutor, and the Curriculum tab is hidden if the course has no lessons yet.
Media Position:
The Media Position option controls where the course intro video / thumbnail is displayed — either In Sidebar (inside the enrollment box, default) or at the Top of Content (a large banner above the tabs).
Labels & Text:
The remaining subsections let you translate or rewrite every piece of text on the single course page:
- Single: Header — breadcrumb labels, the Created by author prefix, and the Share and Wishlist button labels.
- Single: Tabs & Login — the label for each content tab (Overview, Curriculum, Instructor, Reviews, FAQs, Q&A, Announcements) plus the login-gate message and button shown to logged-out visitors.
- Single: Body — all in-content headings and labels, such as the Overview blocks (Learning goals, Skills, Description, Requirements, Audience, Tags), the Curriculum heading and Preview badge, Instructor stats, the Reviews block, FAQ / Q&A / Announcements headings, and the Related Courses titles and button.
- Single: Sidebar — the enrollment box text, including the enroll/continue/retake/complete button labels, the Free price label, money-back / free-access guarantee text, the This course includes heading and the share button.
Instructor:
Edunex ships custom-designed instructor pages powered by Tutor LMS — an Instructor List (archive) and a Single Instructor public profile. All of their labels are managed from Dashboard Edunex Theme Options Instructor
Important: Instructor profiles are only visible when Tutor's public profile is enabled. Go to Tutor LMS Settings General Public Profile and set it to Public. If it is left as Private, opening an instructor profile will redirect to the home page.
Instructor List (Archive):
To display a filterable grid of instructors, add the Tutor LMS instructor shortcode to any page — Edunex automatically restyles it to match the theme:
- Create or edit a page from PagesAdd New
- Insert the shortcode [tutor_instructor_list] into the content and publish.
The list includes a filter sidebar with Search, Expertise (course category) and Rating filters, a Sort by dropdown (Relevant, Newest, Popular) and a results counter. Two labels are configurable under Instructor Archive — the No Results Text and the card Button Text (default: View profile).
Single Instructor (Public Profile):
The single instructor page is opened from any instructor name or card. It shows a header, a set of content tabs, a sticky sidebar and a “Similar instructors” section. Every label is editable under Instructor Single
- Breadcrumbs: the Parent and Current breadcrumb labels.
- Tabs: the labels for the About, Experience, Courses and Reviews tabs.
-
Section headings: the Instructor bio, Core expertise, Experience, Reviews headings, plus the Courses heading which supports
a
%splaceholder that is replaced with the instructor's first name (default: Courses by %s). - Sidebar: the mentorship line, the four stat labels (Rating, Courses, Students, Reviews), the View courses and Send message button text, and the social links title.
- Similar instructors: the section Subtitle, Title and the card Button text.
Events:
Edunex ships a built-in Events system for promoting workshops, webinars, meetups and conferences. It is powered by a custom Event post type
(tj_event) provided by the Edunex Essential plugin, so make sure that plugin is installed and activated (see
Plugin Installation). Once active, an Events menu appears in the WordPress admin sidebar and the theme automatically provides a
fully designed events archive (at /events) and single event page — no shortcode or manual page building is required.
After adding your first event, re-save your permalinks so the event URLs work correctly: Settings Permalinks Save Changes
Event Categories & Tags:
Events use their own taxonomies, separate from blog posts. You can organise events with hierarchical Event Categories and free-form Event Tags, both managed from the Events admin menu: Dashboard Events Categories Dashboard Events Tags
Each category and tag has its own filtered archive page, and both are used by the events archive sidebar widgets (Categories / Tags) and the single-event related events block.
Adding an Event:
To create an event, go to Dashboard Events Add New Add the event Title, main description in the content editor, a Featured Image (used as the event image) and an optional excerpt. Assign one or more Event Categories and Event Tags from the side panels. All of the event-specific details are entered in the Event Settings box below the editor, which is organised into three tabs.
Details tab:
- Event Date: the calendar date of the event.
- Start Time / End Time: free-text times, e.g. 10:00am and 12:00am.
- Location: where the event takes place, e.g. Miami, Florida, USA.
- Total Seats / Seats Booked: used to display the seats-left figure and the “booked” progress bar — both are calculated automatically as Total Seats minus Seats Booked.
- Host Name, Host Image, Host Profile URL: populate the “Hosted by” block shown on the single event page.
Pricing & Countdown tab:
- Price / Old Price: current price (e.g. $49.00) and an optional struck-through original price (e.g. $90.00).
- Discount Badge: a short label such as Early bird.
- Pricing Note: a small line under the price, e.g. Early bird pricing ends 16 Nov.
- Countdown Target: the date & time the “Event starts in” countdown counts down to.
- Book Seat URL: the link used by the “Book a seat” button.
- Add to Calendar URL: an optional link for adding the event to a calendar.
- Guarantee Text: a reassurance line such as Free cancellation until 16 Nov.
Includes tab:
The This Event Includes field builds the “This event includes” list in the sidebar. Enter one item per line. You may optionally prefix an icon
class followed by a pipe (|) to change the bullet icon; without one, a default check icon is used. For example:
- Full access to all 4 sessions
- tji-file | Workshop kit & templates
- tji-download | Session recording afterwards
Events Theme Options:
The global look and content of the events archive and single event pages are controlled from Dashboard Edunex Theme Options Events which is split into four subsections.
Archive:
- Page Title: the main events archive title (default Events). Category/tag archives use the term name instead.
- No Results Text: the message shown when no events match.
- Events Per Page: how many events show per page (default 6; use -1 to show all).
- Enable Sidebar: show or hide the archive sidebar — when disabled, the event grid is full width.
Sidebar:
Toggle each archive sidebar widget on or off and edit its labels:
- Search widget — with editable Title and Placeholder.
- Categories widget — with an editable Title.
- Related Events widget — with an editable Title and a Count (default 3).
- Tags widget — with an editable Title.
Single:
Each block on the single event page can be shown or hidden independently:
- Category Chip: the category tag above the title.
- Event Meta: the date / location / time / seats-left row under the title.
- Host Block: the “Hosted by” author block.
- Header Share Button: the share popup in the page header.
- Tab Navigation: the Overview / Agenda / Speakers / Venue / FAQs tab bar.
- Countdown: the “Events start in” countdown in the sidebar.
- Seats Progress Bar: the “X of Y seats booked” progress bar in the sidebar.
- Includes List: the “This event includes” list in the sidebar.
- Sidebar Share Block: the “Share this event” block at the bottom of the sidebar.
- Related Events: the related events slider at the bottom of the page.
Event Card:
Sets the Button Text shown on each event card in the grid (default Book a seat).
Event Elementor Widgets:
Edunex Essential also adds dedicated Elementor widgets for building event listings and custom single-event layouts. You will find them under the ThemeJunction Addons section when editing a page or template with Elementor:
- Events — a grid/list of events for placing on any page.
- Event Agenda — the schedule/agenda block on the single event page.
- Event Speakers — the speakers block.
- Event Venue — the venue / location block.
- Event Skill — the “what you’ll learn” / skills block.
Translating Theme:
You can easily translate this theme into another language. To ensure your website works properly, you will need to translate the following elements:
- Theme: Edunex
- Plugin: Edunex Essential
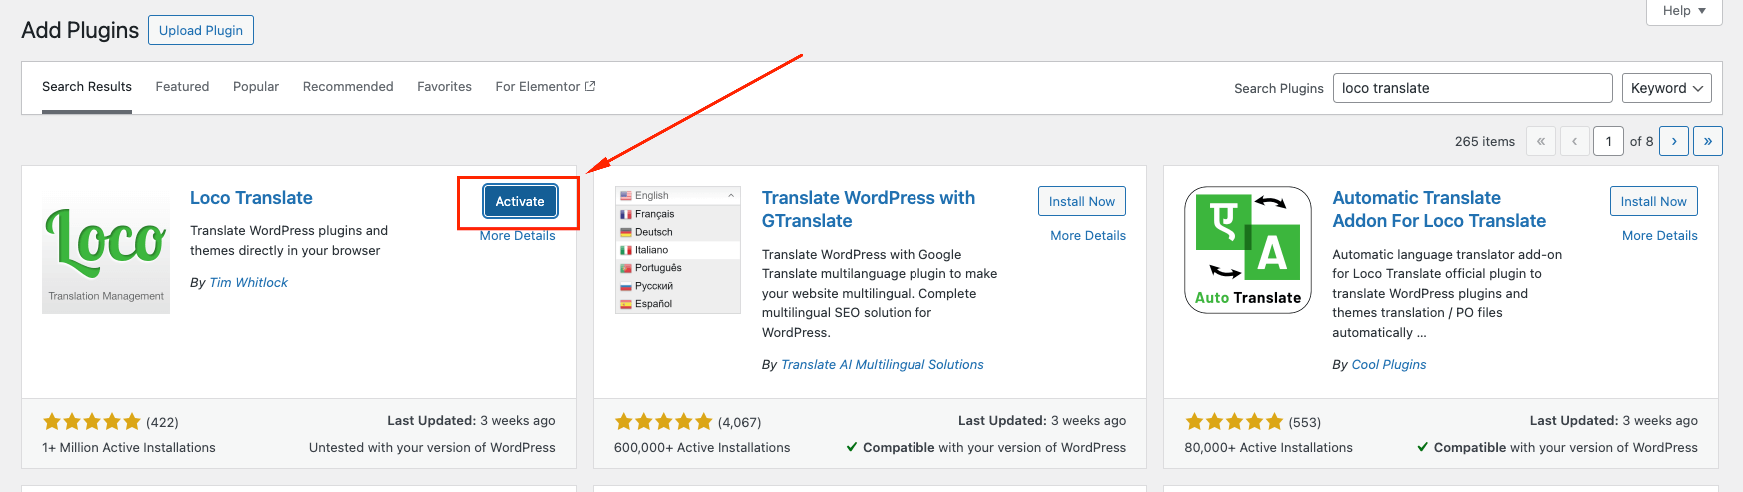
There are many tools available for translation, but the easiest method is to use the Loco Translate plugin. With this plugin, you can translate any WordPress theme or plugin that supports translations.
Here’s a step-by-step tutorial on how to translate any theme or plugin using Loco Translate:
- Install and activate plugin "Loco Translate".
- Select the Theme or Plugin you want to translate from "Loco Translate" menu
- Theme Translate { Edunex }
- Plugin Translate {Edunex Essential }
- Click on New language link
- Select your preferred language, and also select your location as "System". Then click on "Start Translating" button.
Here's a quick video tutorial about how to use Loco Translate:
Updating Theme:
We recommend that you use the Envato Market plugin to keep the theme up-to-date.
- Install and activate the "Envato Market" plugin manually. Here's the plugin zip file: http://envato.github.io/wp-envato-market/dist/envato-market.zip
- Navigate to Plugins Add New
- From WordPress Admin Panel, navigate to "Envato Market" menu.
-
In this page, you'll find a field for Inserting Envato Token. Insert your Envato Token Code from there. You can generate this code from this link:
https://build.envato.com/create-token/?purchase:download=t&purchase:verify=t&purchase:list=t .
Remember, while generating the token, you have to login using the same envato id which you used to purchase theme. - After completed the above steps successfully, Navigate to Appearance Themes. Here you'll see an "Update now" link beside your theme. Click on that link and your theme will be updated automatically
Here's a quick video tutorial explaining this method:
Demo Content Installation Failed:
This is typically a hosting-related issue. On most hosting providers, demo installation works without any problems. However, some hosts may block certain permissions, which can cause this issue. If this occurs, you can contact your hosting provider, or alternatively, submit a support request to our team, and we will assist you in resolving it.
404 Error in All Pages:
If you encounter this issue, please update your permalinks. To do this, navigate to Settings → Permalinks and click the Save Changes button.
Contact Us:
If you encounter any issues, please contact us at Support. We provide 12 hours of real-time support for our customers.
Thank you for purchasing our theme!
need to custom work.
If you need theme customization or want to create a custom theme or template, you can contact with us.
Contact